Skip to content

ROCKPro64 - Eine Einführung für Einsteiger

Verschoben ROCKPro64
  • Wo kann man einen kaufen?

    ROCKPro64 kauft man direkt bei pine64.org im Shop. Hier der direkte Link dahin. Wenn Ihr euch fragt, was kostet das an Zoll und Versandgebühren, hier zeige ich euch das.

    Was kann man alles damit machen? Hier könnte ich jetzt wahrscheinlich unendlich viel aufschreiben, ich schreibe mal aus meiner Sicht, die interessantesten Anwendungen auf.

    • Linux-Server allgemein
    • NAS
    • Retro Gaming Konsole
    • KODI TV System
    • usw.

    Ein Beispiel

    Wir machen uns einen Linux-Server Headless, also ohne GUI. Diesen kann man dann entweder mit der Tastatur direkt am ROCKPro64 bedienen, Bildschirmausgabe auf dem angeschlossenen HDMI-Monitor oder per SSH-Verbindung von dem gewohnten PC aus. Das ist meine bevorzugte Variante, da der PC ja sowieso immer an ist 😉

    Hardware

    Software

    Eingesetzte Version

    Welcome to Ubuntu 18.04.2 LTS (GNU/Linux 4.4.167-1169-rockchip-ayufan-g3cde5c624c9c aarch64)
    

    SD-Karte erstellen

    Das Programm Etcher runterladen und installieren, das gibt es für Linux und Windows. Ist kinderleicht und macht seinen Job. Nach der Installation das Programm starten.

    5d82691c-86d5-4733-bf1d-8d95635ea618-grafik.png

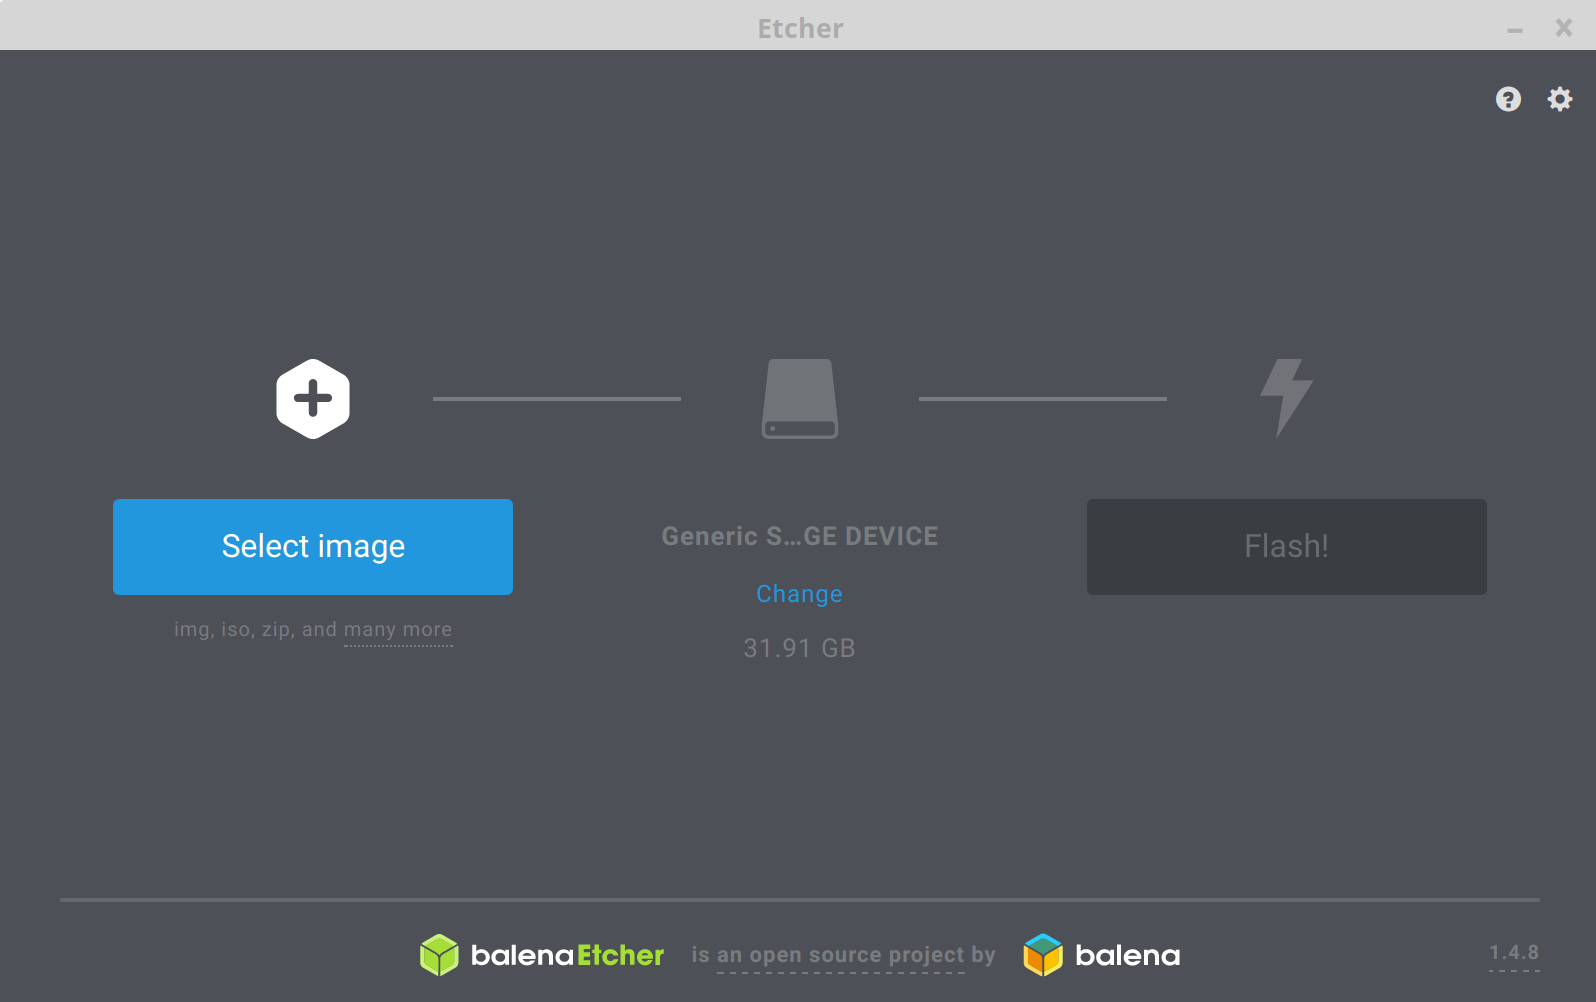
    Das Image auswählen, etcher.io kann das Image auch entpacken. Ich mache das immer vorher selber. In der Mitte die SD-Karte auswählen, das macht etcher.io normalerweise selber. Nach Klick auf "Flash!" wird unter Linux das Root-Passwort abgefragt, danach beschreibt er die SD-Karte. Wenn er fertig ist, kann man die SD-Karte einfach entnehmen.

    Erster Start des ROCKPro64

    Wir nehmen die SD-Karte und stecken sie in den entsprechenden Einschub. Dann noch das LAN-Kabel anschließen und einen Monitor. Zum Schluß stecken wir den Stecker der Spannungsversorgung ein. Nun bootet der ROCKPro64. Die grüne LED neben der Spannungsversorgung zeigt nur an, das die Versorgungsspannung vorhanden ist.

    Wenn die weiße und rote LED angeht, hat der Bootloader ein Image gefunden und startet das System. Nach einiger Zeit, solltet ihr auf dem Monitor Bootmeldungen sehen und zum Schluss folgendes

    Ubuntu 18.04.2 LTS rockpro64 tyy1
    rockpro64 login:
    

    Damit ist der ROCKPro64 erfolgreich gestartet und wartet jetzt auf Euren Login. Login Daten sind

    User: rock64
    PW. rock64
    

    SSH-Login

    Da ich alles von meinem Haupt-PC aus mache, loggen wir uns von da aus ein. Der ROCKPro64 holt sich mittels DHCP eine IP-Adresse von Eurem Router. Diese IP-Adresse müssen wir nun rausbekommen, eine Möglichkeit wäre im Menü des Routers danach zu suchen.

    Eine andere Möglichkeit wäre, das Netzwerk abzusuchen. Dazu benutze ich das Tool nmap. In meinem Netzwerk ist der DHCP von der IP-Adresse 192.168.3.2 bis 192.168.3.19 aktiv. Den Bereich suche ich nun ab.

    frank@frank-MS-7A34:~$ nmap 192.168.3.2-19
    
    Starting Nmap 7.60 ( https://nmap.org ) at 2019-04-06 14:59 CEST
    Nmap scan report for 192.168.3.12
    Host is up (0.0014s latency).
    Not shown: 999 closed ports
    PORT   STATE SERVICE
    22/tcp open  ssh
    
    Nmap done: 18 IP addresses (1 host up) scanned in 1.57 seconds
    

    Nun bekommen wir als Ergebnis einen Rechner auf der IP-Adresse 192.168.3.12 angezeigt. Man kann auch direkt sehen, das der SSH Dienst auf dem Standardport 22 aktiv ist.

    Dann loggen wir uns mal ein.

    ssh rock64@192.168.3.12
    

    Erfolgsmeldung

    frank@frank-MS-7A34:~$ ssh rock64@192.168.3.12
    rock64@192.168.3.12's password: 
    Welcome to Ubuntu 18.04.2 LTS (GNU/Linux 4.4.167-1169-rockchip-ayufan-g3cde5c624c9c aarch64)
                    _                     __   _  _   
     _ __ ___   ___| | ___ __  _ __ ___  / /_ | || |  
    | '__/ _ \ / __| |/ / '_ \| '__/ _ \| '_ \| || |_ 
    | | | (_) | (__|   <| |_) | | | (_) | (_) |__   _|
    |_|  \___/ \___|_|\_\ .__/|_|  \___/ \___/   |_|  
                        |_|                           
    
     * Documentation:  https://help.ubuntu.com
     * Management:     https://landscape.canonical.com
     * Support:        https://ubuntu.com/advantage
    
      System information as of Sat Apr  6 13:03:17 UTC 2019
    
      System load:  0.08              Processes:           166
      Usage of /:   9.3% of 14.45GB   Users logged in:     0
      Memory usage: 6%                IP address for eth0: 192.168.3.12
      Swap usage:   0%
    
     * Ubuntu's Kubernetes 1.14 distributions can bypass Docker and use containerd
       directly, see https://bit.ly/ubuntu-containerd or try it now with
    
         snap install microk8s --classic
    Last login: Sat Apr  6 09:53:06 2019 from 192.168.3.213
    

    Erste Schritte

    Nachdem wir uns erfolgreich eingeloggt haben, schauen wir erst mal nach, ob das System aktuell ist.

    rock64@rockpro64:~$ sudo apt update
    [sudo] password for rock64: 
    Hit:1 http://ports.ubuntu.com/ubuntu-ports bionic InRelease
    Get:2 http://ports.ubuntu.com/ubuntu-ports bionic-security InRelease [88.7 kB]
    Hit:3 http://ppa.launchpad.net/ayufan/rock64-ppa/ubuntu bionic InRelease
    Hit:4 http://ppa.launchpad.net/ayufan/all-ppa/ubuntu bionic InRelease                          
    Get:5 http://ports.ubuntu.com/ubuntu-ports bionic-updates InRelease [88.7 kB]                  
    Get:6 http://deb.ayufan.eu/orgs/ayufan-rock64/releases  InRelease [1339 B]
    Get:7 http://ports.ubuntu.com/ubuntu-ports bionic-updates/main arm64 Packages [463 kB]
    Get:8 http://ports.ubuntu.com/ubuntu-ports bionic-updates/universe arm64 Packages [643 kB]
    Get:9 http://deb.ayufan.eu/orgs/ayufan-rock64/releases  Packages [106 kB]         
    Fetched 1391 kB in 3s (552 kB/s)               
    Reading package lists... Done
    Building dependency tree       
    Reading state information... Done
    All packages are up to date.
    
    rock64@rockpro64:~$ sudo apt upgrade
    Reading package lists... Done
    Building dependency tree       
    Reading state information... Done
    Calculating upgrade... Done
    0 upgraded, 0 newly installed, 0 to remove and 0 not upgraded.
    

    Ok, alles aktuell 🙂

    Ich habe hier einen Thread zum Thema erstellt, was man so als erstes machen sollte.

    • Passwort ändern!!
    • Lokale Settings anpassen
    • Evt. auf fixe IP-Adresse einstellen
    • Hostname einstellen

    Wie das geht, könnt ihr in dem anderen Thread nachlesen.

    Wichtig

    Diese Vorgehensweise ist nicht geeignet für einen Server, der von außerhalb direkt aus dem Internet erreichbar ist. Dazu bedarf es noch einiger anderer Einstellungen. Ein paar

    • iptables
    • fail2ban
    • ssh port ändern
    • usw.

    Das soll hier aber nicht das Thema sein. Ich gehe davon aus, das dieser Server in einem lokalen Netz steht, der nicht von außerhalb erreichbar ist.

    Serielle konsole

    Wenn es mal Probleme gibt, beim Booten oder sonst was, ist das absolut Wichtigstes bei diesen kleinen Platinen eine serielle Konsole (UART). Kostet nicht viel, also unbedingt mitbestellen!!

    Ein Beitrag zum Thema gibt es hier.

    Zum Schluß, viel Spaß und viel Erfolg!

  • 0 Stimmen
    1 Beiträge
    85 Aufrufe
    Niemand hat geantwortet
  • ROCKPro64 - USB3 Probleme

    ROCKPro64
    1
    0 Stimmen
    1 Beiträge
    825 Aufrufe
    Niemand hat geantwortet
  • Benchmark

    ROCKPro64
    1
    0 Stimmen
    1 Beiträge
    442 Aufrufe
    Niemand hat geantwortet
  • ROCKPro WLan Modul

    Verschoben ROCKPro64
    1
    0 Stimmen
    1 Beiträge
    689 Aufrufe
    Niemand hat geantwortet
  • 0 Stimmen
    3 Beiträge
    1k Aufrufe
    FrankMF

    Ein paar Hardware Änderungen

    Weiße LED gedimmt

    0_1532529766212_IMG_20180725_151430_ergebnis.jpg

    Neue LED grün, neben dem Eingang der Stromversorgung

    0_1532529863801_IMG_20180725_151421_geändert.jpg

  • Release Empfehlung für Einsteiger

    Verschoben Archiv
    2
    0 Stimmen
    2 Beiträge
    1k Aufrufe
    FrankMF

    Sieht so aus, als wenn wir ein neues Traumpaar haben. 🙂

    0.7.7

    und

    rock64@rockpro64:/mnt$ uname -a Linux rockpro64 4.18.0-rc3-1046-ayufan-ge76778b6aa4b #1 SMP PREEMPT Thu Jul 19 14:10:17 UTC 2018 aarch64 aarch64 aarch64 GNU/Linux
  • stretch-minimal-rockpro64

    Verschoben Linux
    3
    0 Stimmen
    3 Beiträge
    982 Aufrufe
    FrankMF

    Mal ein Test was der Speicher so kann.

    rock64@rockpro64:~/tinymembench$ ./tinymembench tinymembench v0.4.9 (simple benchmark for memory throughput and latency) ========================================================================== == Memory bandwidth tests == == == == Note 1: 1MB = 1000000 bytes == == Note 2: Results for 'copy' tests show how many bytes can be == == copied per second (adding together read and writen == == bytes would have provided twice higher numbers) == == Note 3: 2-pass copy means that we are using a small temporary buffer == == to first fetch data into it, and only then write it to the == == destination (source -> L1 cache, L1 cache -> destination) == == Note 4: If sample standard deviation exceeds 0.1%, it is shown in == == brackets == ========================================================================== C copy backwards : 2812.7 MB/s C copy backwards (32 byte blocks) : 2811.9 MB/s C copy backwards (64 byte blocks) : 2632.8 MB/s C copy : 2667.2 MB/s C copy prefetched (32 bytes step) : 2633.5 MB/s C copy prefetched (64 bytes step) : 2640.8 MB/s C 2-pass copy : 2509.8 MB/s C 2-pass copy prefetched (32 bytes step) : 2431.6 MB/s C 2-pass copy prefetched (64 bytes step) : 2424.1 MB/s C fill : 4887.7 MB/s (0.5%) C fill (shuffle within 16 byte blocks) : 4883.0 MB/s C fill (shuffle within 32 byte blocks) : 4889.3 MB/s C fill (shuffle within 64 byte blocks) : 4889.2 MB/s --- standard memcpy : 2807.3 MB/s standard memset : 4890.4 MB/s (0.3%) --- NEON LDP/STP copy : 2803.7 MB/s NEON LDP/STP copy pldl2strm (32 bytes step) : 2802.1 MB/s NEON LDP/STP copy pldl2strm (64 bytes step) : 2800.7 MB/s NEON LDP/STP copy pldl1keep (32 bytes step) : 2745.5 MB/s NEON LDP/STP copy pldl1keep (64 bytes step) : 2745.8 MB/s NEON LD1/ST1 copy : 2801.9 MB/s NEON STP fill : 4888.9 MB/s (0.3%) NEON STNP fill : 4850.1 MB/s ARM LDP/STP copy : 2803.8 MB/s ARM STP fill : 4893.0 MB/s (0.5%) ARM STNP fill : 4851.7 MB/s ========================================================================== == Framebuffer read tests. == == == == Many ARM devices use a part of the system memory as the framebuffer, == == typically mapped as uncached but with write-combining enabled. == == Writes to such framebuffers are quite fast, but reads are much == == slower and very sensitive to the alignment and the selection of == == CPU instructions which are used for accessing memory. == == == == Many x86 systems allocate the framebuffer in the GPU memory, == == accessible for the CPU via a relatively slow PCI-E bus. Moreover, == == PCI-E is asymmetric and handles reads a lot worse than writes. == == == == If uncached framebuffer reads are reasonably fast (at least 100 MB/s == == or preferably >300 MB/s), then using the shadow framebuffer layer == == is not necessary in Xorg DDX drivers, resulting in a nice overall == == performance improvement. For example, the xf86-video-fbturbo DDX == == uses this trick. == ========================================================================== NEON LDP/STP copy (from framebuffer) : 602.5 MB/s NEON LDP/STP 2-pass copy (from framebuffer) : 551.6 MB/s NEON LD1/ST1 copy (from framebuffer) : 667.1 MB/s NEON LD1/ST1 2-pass copy (from framebuffer) : 605.6 MB/s ARM LDP/STP copy (from framebuffer) : 445.3 MB/s ARM LDP/STP 2-pass copy (from framebuffer) : 428.8 MB/s ========================================================================== == Memory latency test == == == == Average time is measured for random memory accesses in the buffers == == of different sizes. The larger is the buffer, the more significant == == are relative contributions of TLB, L1/L2 cache misses and SDRAM == == accesses. For extremely large buffer sizes we are expecting to see == == page table walk with several requests to SDRAM for almost every == == memory access (though 64MiB is not nearly large enough to experience == == this effect to its fullest). == == == == Note 1: All the numbers are representing extra time, which needs to == == be added to L1 cache latency. The cycle timings for L1 cache == == latency can be usually found in the processor documentation. == == Note 2: Dual random read means that we are simultaneously performing == == two independent memory accesses at a time. In the case if == == the memory subsystem can't handle multiple outstanding == == requests, dual random read has the same timings as two == == single reads performed one after another. == ========================================================================== block size : single random read / dual random read 1024 : 0.0 ns / 0.0 ns 2048 : 0.0 ns / 0.0 ns 4096 : 0.0 ns / 0.0 ns 8192 : 0.0 ns / 0.0 ns 16384 : 0.0 ns / 0.0 ns 32768 : 0.0 ns / 0.0 ns 65536 : 4.5 ns / 7.2 ns 131072 : 6.8 ns / 9.7 ns 262144 : 9.8 ns / 12.8 ns 524288 : 11.4 ns / 14.7 ns 1048576 : 16.0 ns / 22.6 ns 2097152 : 114.0 ns / 175.3 ns 4194304 : 161.7 ns / 219.9 ns 8388608 : 190.7 ns / 241.5 ns 16777216 : 205.3 ns / 250.5 ns 33554432 : 212.9 ns / 255.5 ns 67108864 : 222.3 ns / 271.1 ns
  • Images 0.6.x

    Verschoben Images
    30
    0 Stimmen
    30 Beiträge
    6k Aufrufe
    FrankMF

    0.6.60 released

    0.6.60: Fix pcie/nvme/sata support for 4.4, 0.6.60: Fix spi-flash access for 4.4/mainline,

    Ich bin davon ausgegangen, das 0.6.x nict mehr fortgeführt wird, okay - sieht nicht so aus.

    Sollte released werden, ist aber aus irgendeinem Grund gestern nicht passiert (lt. Kamil)