Skip to content

Let's Encrypt installieren

Verschoben Let's Encrypt
  • Was ist Let's Encrypt?

    Let’s Encrypt (deutsch „Lasst uns verschlüsseln“) ist eine Zertifizierungsstelle, die Ende 2015 in Betrieb gegangen ist und kostenlose X.509-Zertifikate für Transport Layer Security (TLS) anbietet. Dabei ersetzt ein automatisierter Prozess die bisher gängigen komplexen händischen Vorgänge bei der Erstellung, Validierung, Signierung, Einrichtung und Erneuerung von Zertifikaten für verschlüsselte Websites.

    Quelle: de.wikipedia.org

    Ziel des Ganzen ist es, den Datentransport zwischen dem Client und dem Webserver zu verschlüsseln, so das unterwegs niemand die Daten mitlesen kann.

    Vorbereitung

    Bei meinem Serverumzug ist folgendes aufgefallen.

     Sep 29 14:22:27 amadeus nginx[1078]: nginx: [emerg] BIO_new_file("/etc/nginx/dhparams.pem") failed (SSL: error:02001002:system
    

    Nginx meckert über einen nicht vorhanden Schlüssel. Hmm, etwas googlen und fündig geworden.

    Man muss mittels openssl erstmal einen geheimen privaten Key erzeugen.

    root@amadeus /etc/letsencrypt # openssl dhparam -out /etc/ssl/certs/dhparam.pem 2048
    Generating DH parameters, 2048 bit long safe prime, generator 2
    This is going to take a long time
    ...........................................................................+...................................................................
    (gekürzt)
    

    Das erzeugt im angegebenen Verzeichnis einen 2048 Bit langen Schlüssel. Ganz ängstliche wählen 4096 Bit. Mit der Option "-aes256" kann man den Key auch noch mit einem Passwort verschlüsseln.

    Das File in den Ordner /etc/nginx kopieren und fertig. Ich habe da noch ein kleines Problem, das in der Konfiguration das File dhparams.pem heißt, das erzeugte File aber dhparam.pem. Vermutlich ein Tippfehler von mir, schau ich mir nochmal an. Vorerst habe ich die Datei einfach umbenannt.

    Installation

    Nach dem Hinweis meines Sysadmins 🙂 muss ich das hier noch ein wenig verfeinern.

    apt install letsencrypt
    

    Danach

    root@one /opt/letsencrypt # /etc/init.d/nginx stop
    [ ok ] Stopping nginx (via systemctl): nginx.service.
    root@one /opt/letsencrypt # letsencrypt certonly --standalone -d frank-mankel.org -d www.frank-mankel.org
    Saving debug log to /var/log/letsencrypt/letsencrypt.log
    Plugins selected: Authenticator standalone, Installer None
    Obtaining a new certificate
    Performing the following challenges:
    http-01 challenge for frank-mankel.org
    http-01 challenge for www.frank-mankel.org
    Waiting for verification...
    Cleaning up challenges
    
    IMPORTANT NOTES:
     - Congratulations! Your certificate and chain have been saved at:
       /etc/letsencrypt/live/frank-mankel.org/fullchain.pem
       Your key file has been saved at:
       /etc/letsencrypt/live/frank-mankel.org/privkey.pem
       Your cert will expire on 2018-07-13. To obtain a new or tweaked
       version of this certificate in the future, simply run
       letsencrypt-auto again. To non-interactively renew *all* of your
       certificates, run "letsencrypt-auto renew"
     - If you like Certbot, please consider supporting our work by:
    
       Donating to ISRG / Let's Encrypt:   https://letsencrypt.org/donate
       Donating to EFF:                    https://eff.org/donate-le
    

    Das hat schon mal geklappt!!

    Hinweis

    Der Certbot kann je nach System entweder

    certbot-auto
    

    oder

    certbot
    

    heißen. Quelle: https://certbot.eff.org/docs/intro.html#installation

    Hier liegen die Zertifikate

    /etc/letsencrypt/live/frank-mankel.org
    

    Dort liegen jetzt folgende Files:

    root@one /etc/letsencrypt/live/frank-mankel.org # ls -l
    total 4
    lrwxrwxrwx 1 root root  40 Apr 14 15:15 cert.pem -> ../../archive/frank-mankel.org/cert1.pem
    lrwxrwxrwx 1 root root  41 Apr 14 15:15 chain.pem -> ../../archive/frank-mankel.org/chain1.pem
    lrwxrwxrwx 1 root root  45 Apr 14 15:15 fullchain.pem -> ../../archive/frank-mankel.org/fullchain1.pem
    lrwxrwxrwx 1 root root  43 Apr 14 15:15 privkey.pem -> ../../archive/frank-mankel.org/privkey1.pem
    -rw-r--r-- 1 root root 543 Apr 14 15:15 README
    

    Zertifikate in nginx einbauen

    nginx stoppen:

    /etc/init.d/nginx stop
    

    Meine alte nginx Datei OHNE https. Datei default

    server {
    if ($host != 'frank-mankel.org' ) {
    rewrite ^/(.*)$ http://frank-mankel.org/$1 permanent;
    }
    
        listen 80;
    
        server_name frank-mankel.org;
    
        location / {
            proxy_set_header X-Real-IP $remote_addr;
            proxy_set_header X-Forwarded-For $proxy_add_x_forwarded_for;
            proxy_set_header X-Forwarded-Proto $scheme;
            proxy_set_header Host $http_host;
            proxy_set_header X-NginX-Proxy true;
    
            proxy_pass http://127.0.0.1:4567;
            proxy_redirect off;
    
            # Socket.IO Support
            proxy_http_version 1.1;
            proxy_set_header Upgrade $http_upgrade;
            proxy_set_header Connection "upgrade";
        }
    }
    

    NEUE Datei mit https!!

    ### redirects http requests to https
    
    server {
        server_name  www.frank-mankel.org;
        rewrite ^(.*) http://frank-mankel.org$1 permanent;
    }


    server {
        listen 80;
        server_name frank-mankel.org;
        return 302 https://$server_name$request_uri;
    }
    
    ### the https server
    server {
        # listen on ssl, deliver with speedy if possible
        listen 443 ssl spdy;
    
        server_name frank-mankel.org;
    
    
        # change these paths!
        ssl_certificate /etc/letsencrypt/live/frank-mankel.org/fullchain.pem;
        ssl_certificate_key /etc/letsencrypt/live/frank-mankel.org/privkey.pem;
    
        # enables all versions of TLS, but not SSLv2 or 3 which are weak and now deprecated.
        ssl_protocols TLSv1 TLSv1.1 TLSv1.2;
    
        # disables all weak ciphers
        ssl_ciphers 'AES128+EECDH:AES128+EDH';
    
        ssl_prefer_server_ciphers on;
    
        location / {
            proxy_set_header X-Real-IP $remote_addr;
            proxy_set_header X-Forwarded-For $proxy_add_x_forwarded_for;
            proxy_set_header X-Forwarded-Proto $scheme;
            proxy_set_header Host $http_host;
            proxy_set_header X-NginX-Proxy true;
    
            proxy_pass http://127.0.0.1:4567;  # no trailing slash
            proxy_redirect off;
    
            # Socket.IO Support
            proxy_http_version 1.1;
            proxy_set_header Upgrade $http_upgrade;
            proxy_set_header Connection "upgrade";
        }
    }
    

    Der Ganze http Verkehr wird nach https umgeleitet.

    Als allererstes strippen wir www aus dem Namen.

    if ($host != 'frank-mankel.org' ) {
     rewrite ^/(.*)$ http://frank-mankel.org/$1 permanent;
    }
    

    Der Rest entspricht der nginx Doku!

    Jetzt bauen wir das Zertifikat ein. Pfade anpassen.

    # change these paths!
        ssl_certificate /etc/letsencrypt/live/frank-mankel.org/fullchain.pem;
        ssl_certificate_key /etc/letsencrypt/live/frank-mankel.org/privkey.pem;
    

    Danach speichern und nginx wieder starten

    /etc/init.d/nginx start  
    

    Alles Testen und schauen ob alles funktioniert.

    Zertifikat erneuern

    Das Let's Encrypt Zertifikat läuft nur 90 Tage, danach muss es erneuert werden!

    Also legen wir uns einen crontab an

    crontab -e
    

    Wir fügen folgende Zeile hinzu.

     * 3  1 * * certbot -q renew
    

    Das war mein erster Versuch, das gibt aber einen Fehler. So lange nginx läuft, geht das nicht. Aber dafür kann man dem certbot Befehle mitgeben um nginx zu stoppen und zu starten. Das sieht dann so aus.

    * 3  1 * * certbot renew --pre-hook "service nginx stop" --post-hook "service nginx start"
    

    Eine erfolgreiche Zertifikatsverlängerung sieht dann so aus.

    certbot renew --pre-hook "service nginx stop" --post-hook "service nginx start"
    Saving debug log to /var/log/letsencrypt/letsencrypt.log
    
    -------------------------------------------------------------------------------
    Processing /etc/letsencrypt/renewal/frank-mankel.org.conf
    -------------------------------------------------------------------------------
    Attempting to parse the version 0.23.0 renewal configuration file found at /etc/letsencrypt/renewal/frank-mankel.org.conf with version 0.10.2 of Certbot. This might not work.
    Cert is due for renewal, auto-renewing...
    Running pre-hook command: service nginx stop
    Renewing an existing certificate
    Performing the following challenges:
    tls-sni-01 challenge for frank-mankel.org
    tls-sni-01 challenge for www.frank-mankel.org
    Waiting for verification...
    Cleaning up challenges
    Generating key (2048 bits): /etc/letsencrypt/keys/0004_key-certbot.pem
    Creating CSR: /etc/letsencrypt/csr/0004_csr-certbot.pem
    
    -------------------------------------------------------------------------------
    new certificate deployed without reload, fullchain is
    /etc/letsencrypt/live/frank-mankel.org/fullchain.pem
    -------------------------------------------------------------------------------
    
    Congratulations, all renewals succeeded. The following certs have been renewed:
      /etc/letsencrypt/live/frank-mankel.org/fullchain.pem (success)
    Running post-hook command: service nginx start
    

    Erledigt 🙂

    Vielen Dank für eine tolle Anleitung zum Thema! Quelle: https://willy-tech.de/ssl-zertifikat-mit-lets-encrypt-erstellen/

  • Ich will das Ganze um eine Subdomain erweitern

    root@one /opt/letsencrypt # letsencrypt certonly --standalone -d frank-mankel.org -d www.frank-mankel.org -d forum.frank-mankel.org 
    Saving debug log to /var/log/letsencrypt/letsencrypt.log
    Plugins selected: Authenticator standalone, Installer None
    
    - - - - - - - - - - - - - - - - - - - - - - - - - - - - - - - - - - - - - - - -
    You have an existing certificate that contains a portion of the domains you
    requested (ref: /etc/letsencrypt/renewal/frank-mankel.org.conf)
    
    It contains these names: frank-mankel.org, www.frank-mankel.org
    
    You requested these names for the new certificate: frank-mankel.org,
    www.frank-mankel.org, forum.frank-mankel.org.
    
    Do you want to expand and replace this existing certificate with the new
    certificate?
    - - - - - - - - - - - - - - - - - - - - - - - - - - - - - - - - - - - - - - - -
    (E)xpand/(C)ancel: E
    Renewing an existing certificate
    Performing the following challenges:
    http-01 challenge for forum.frank-mankel.org
    tls-sni-01 challenge for frank-mankel.org
    tls-sni-01 challenge for www.frank-mankel.org
    Waiting for verification...
    Cleaning up challenges
    
    IMPORTANT NOTES:
     - Congratulations! Your certificate and chain have been saved at:
       /etc/letsencrypt/live/frank-mankel.org/fullchain.pem
       Your key file has been saved at:
       /etc/letsencrypt/live/frank-mankel.org/privkey.pem
       Your cert will expire on 2018-10-17. To obtain a new or tweaked
       version of this certificate in the future, simply run
       letsencrypt-auto again. To non-interactively renew *all* of your
       certificates, run "letsencrypt-auto renew"
     - If you like Certbot, please consider supporting our work by:
    
       Donating to ISRG / Let's Encrypt:   https://letsencrypt.org/donate
       Donating to EFF:                    https://eff.org/donate-le
    
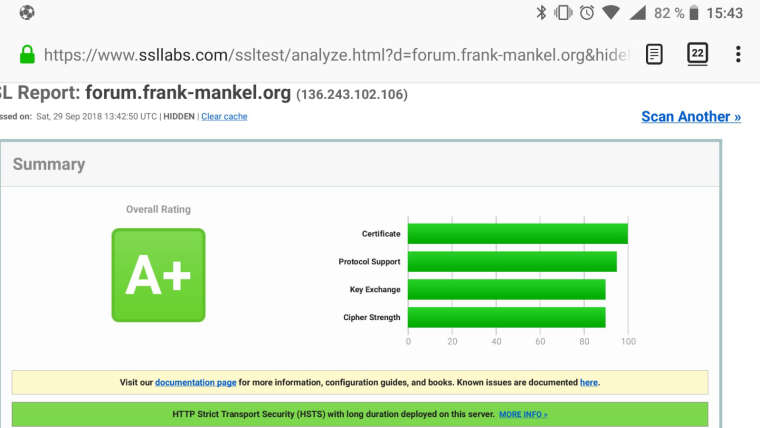
  • Wenn ihr alles richtig gemacht habt, dann könnt ihr Euer Zertifikat überprüfen lassen. Sollte dann so aussehen.

    0_1538314120455_index.jpeg

  • FrankMF FrankM hat am auf dieses Thema verwiesen

  • KDE neon Unstable Edition

    Linux
    6
    0 Stimmen
    6 Beiträge
    230 Aufrufe
    FrankMF

    Heute Morgen beim ☕ mal die Testinstallation aktualisiert. 484 Pakete 😳

    Screenshot_20231125_092126.png

    Nach dem Klicken auf Alle aktualisieren, startete der Rechner neu und installierte dann die Updates!? Holy Fuck, das erinnert mich an M$. Aber gut, KDE Neon soll ja auch nicht mein Hauptsystem werden.

  • 0 Stimmen
    1 Beiträge
    84 Aufrufe
    Niemand hat geantwortet
  • NodeBB - Update auf v1.18.6

    NodeBB
    1
    0 Stimmen
    1 Beiträge
    127 Aufrufe
    Niemand hat geantwortet
  • Ubuntu Cinnamon Remix 21.04

    Linux
    2
    0 Stimmen
    2 Beiträge
    242 Aufrufe
    FrankMF

    Nach einem kurzen Test denke ich, das für das Projekt noch eine Menge Arbeit wartet.

    Verschlüsselte Installation

    Geht nicht, nach Reboot klappt die Passwortabfrage nicht 😡

    Unverschlüsselte Installation

    Ok, nachdem ich dann die Zeichensatzprobleme im Griff hatte, warum bekommt man das eigentlich nicht in den Griff?, hatte ich nach der zweiten Installation eine funktionierende Installation.

    Kurz Fazit

    Dringend den Installer überarbeiten. Die Ubuntu Installation funktioniert auf dem Rechner problemlos. Der Desktop gefällt mir auf den ersten Blick ganz gut. Kein Wunder, man fühlt sich ja sofort zu Hause 😉

    Aktuell in meinen Augen produktiv nicht einsetzbar! Und HiDPi habe ich noch gar nicht getestet...

  • LUKS verschlüsselte Platte mounten

    Linux
    2
    0 Stimmen
    2 Beiträge
    654 Aufrufe
    FrankMF

    So, jetzt das ganze noch einen Ticken komplizierter 🙂

    Ich habe ja heute, für eine Neuinstallation von Ubuntu 20.04 Focal eine zweite NVMe SSD eingebaut. Meinen Bericht zu dem Thema findet ihr hier. Aber, darum soll es jetzt hier nicht gehen.

    Wir haben jetzt zwei verschlüsselte Ubuntu NVMe SSD Riegel im System. Jetzt klappt die ganze Sache da oben nicht mehr. Es kommt immer einen Fehlermeldung.

    unbekannter Dateisystemtyp „LVM2_member“.

    Ok, kurz googlen und dann findet man heraus, das es nicht klappen kann, weil beide LVM Gruppen, den selben Namen benutzen.

    root@frank-MS-7C37:/mnt/crypthome/root# vgdisplay --- Volume group --- VG Name vgubuntu2 System ID Format lvm2 Metadata Areas 1 Metadata Sequence No 4 VG Access read/write VG Status resizable MAX LV 0 Cur LV 2 Open LV 1 Max PV 0 Cur PV 1 Act PV 1 VG Size <464,53 GiB PE Size 4,00 MiB Total PE 118919 Alloc PE / Size 118919 / <464,53 GiB Free PE / Size 0 / 0 VG UUID lpZxyv-cNOS-ld2L-XgvG-QILa-caHS-AaIC3A --- Volume group --- VG Name vgubuntu System ID Format lvm2 Metadata Areas 1 Metadata Sequence No 3 VG Access read/write VG Status resizable MAX LV 0 Cur LV 2 Open LV 2 Max PV 0 Cur PV 1 Act PV 1 VG Size <475,71 GiB PE Size 4,00 MiB Total PE 121781 Alloc PE / Size 121781 / <475,71 GiB Free PE / Size 0 / 0 VG UUID jRYTXL-zjpY-lYr6-KODT-u0LJ-9fYf-YVDna7

    Hier oben sieht man das schon mit geändertem Namen. Der VG Name muss unterschiedlich sein. Auch dafür gibt es ein Tool.

    root@frank-MS-7C37:/mnt/crypthome/root# vgrename --help vgrename - Rename a volume group Rename a VG. vgrename VG VG_new [ COMMON_OPTIONS ] Rename a VG by specifying the VG UUID. vgrename String VG_new [ COMMON_OPTIONS ] Common options for command: [ -A|--autobackup y|n ] [ -f|--force ] [ --reportformat basic|json ] Common options for lvm: [ -d|--debug ] [ -h|--help ] [ -q|--quiet ] [ -v|--verbose ] [ -y|--yes ] [ -t|--test ] [ --commandprofile String ] [ --config String ] [ --driverloaded y|n ] [ --nolocking ] [ --lockopt String ] [ --longhelp ] [ --profile String ] [ --version ] Use --longhelp to show all options and advanced commands.

    Das muss dann so aussehen!

    vgrename lpZxyv-cNOS-ld2L-XgvG-QILa-caHS-AaIC3A vgubuntu2 ACHTUNG Es kann zu Datenverlust kommen, also wie immer, Hirn einschalten!

    Ich weiß, das die erste eingebaute Platte mit der Nummer /dev/nvme0n1 geführt wird. Die zweite, heute verbaute, hört dann auf den Namen /dev/nvme1n1. Die darf ich nicht anpacken, weil sonst das System nicht mehr startet.

    /etc/fstab

    # /etc/fstab: static file system information. # # Use 'blkid' to print the universally unique identifier for a # device; this may be used with UUID= as a more robust way to name devices # that works even if disks are added and removed. See fstab(5). # # <file system> <mount point> <type> <options> <dump> <pass> /dev/mapper/vgubuntu-root / ext4 errors=remount-ro 0 1 # /boot was on /dev/nvme1n1p2 during installation UUID=178c7e51-a1d7-4ead-bbdf-a956eb7b754f /boot ext4 defaults 0 2 # /boot/efi was on /dev/nvme0n1p1 during installation UUID=7416-4553 /boot/efi vfat umask=0077 0 1 /dev/mapper/vgubuntu-swap_1 none swap sw 0 0

    Jo, wenn jetzt die Partition /dev/mapper/vgubuntu2-root / anstatt /dev/mapper/vgubuntu-root / heißt läuft nichts mehr. Nur um das zu verdeutlichen, auch das könnte man problemlos reparieren. Aber, ich möchte nur warnen!!

    Nachdem die Änderung durchgeführt wurde, habe ich den Rechner neugestartet. Puuh, Glück gehabt, richtige NVMe SSD erwischt 🙂

    Festplatte /dev/mapper/vgubuntu2-root: 463,58 GiB, 497754832896 Bytes, 972177408 Sektoren Einheiten: Sektoren von 1 * 512 = 512 Bytes Sektorgröße (logisch/physikalisch): 512 Bytes / 512 Bytes E/A-Größe (minimal/optimal): 512 Bytes / 512 Bytes

    Nun können wir die Platte ganz normal, wie oben beschrieben, mounten. Nun kann ich noch ein paar Dinge kopieren 😉

  • Let's Encrypt - Crontab

    Let's Encrypt
    1
    0 Stimmen
    1 Beiträge
    204 Aufrufe
    Niemand hat geantwortet
  • mdadm

    Verschoben Linux
    5
    0 Stimmen
    5 Beiträge
    354 Aufrufe
    FrankMF

    Nachdem ich die SATA-Karte gewechselt habe, sind meine Probleme verschwunden. Mein NAS läuft seit Monaten einwandfrei.

    rock64@rp64v_2_1_NAS:~$ uptime 21:57:50 up 73 days, 4:44, 1 user, load average: 0,00, 0,00, 0,00

    https://forum.frank-mankel.org/topic/299/sata-karte-marvell-88se9230-chipsatz/16

  • 0 Stimmen
    12 Beiträge
    3k Aufrufe
    FrankMF

    Da btrfs bei mir ja nicht so der Bringer war, Fehler im Image vom Kamil?, Fehler in btrfs? Ich weiß es nicht, also weg damit! Da ich das NAS noch richtig produktiv genutzt hatte, waren die Daten schnell gesichert. Danach das NAS neugestartet, nun sind die beiden Platten nicht mehr gemountet und wir können damit arbeiten.

    ACHTUNG! Ich bitte wie immer darum, das Gehirn ab hier einzuschalten! Sonst droht Datenverlust! Aus Sicherheitsgründen gebe ich hier die Laufwerke so an = sdX1 Das X bitte entsprechend austauschen!

    Die beiden Platten mit

    sudo fdisk /dev/sdX

    neu einrichten. Alte Partition weg, neu einrichten usw. Im Detail gehe ich hier jetzt nicht drauf ein. Ich gehe davon aus, das das bekannt ist.

    Der Plan

    raid_pool0 = sdX1 = /dev/mapper/raid_pool0
    raid_pool1 = sdX1 = /dev/mapper/raid_pool1

    Verschlüsseln sudo cryptsetup --key-size 512 --hash sha256 --iter-time 5000 --use-random luksFormat /dev/sdX1 sudo cryptsetup --key-size 512 --hash sha256 --iter-time 5000 --use-random luksFormat /dev/sdX1 Platten entschlüsseln sudo cryptsetup open /dev/sdX1 raid_pool0 sudo cryptsetup open /dev/sdX1 raid_pool1 RAID1 anlegen sudo mdadm --create /dev/md0 --auto md --level=1 --raid-devices=2 /dev/mapper/raid_pool0 /dev/mapper/raid_pool1 sudo mkfs.ext4 /dev/md0 Script zum Entschlüsseln und Mounten crypt.sh #!/bin/bash ###############################################################################$ # Autor: Frank Mankel # Verschlüsseltes Raid1 einbinden! # # Hardware: # ROCKPro64v2.1 # PCIe SATA Karte # 2St. 2,5 Zoll HDD Platten a 2TB # # Software: # bionic-minimal 0.7.9 # Kontakt: frank.mankel@gmail.com # ###############################################################################$ #Passwort abfragen echo "Passwort eingeben!" read -s password echo "Bitte warten......" #Passwörter abfragen echo -n $password | cryptsetup open /dev/sdX1 raid_pool0 -d - echo -n $password | cryptsetup open /dev/sdX1 raid_pool1 -d - #Raid1 mounten mount /dev/md0 /mnt/raid echo "Laufwerke erfolgreich gemountet!"

    Bis jetzt sieht das Raid ok aus, ich werde das die nächsten Tage mal ein wenig im Auge behalten.

    [ 82.430293] device-mapper: uevent: version 1.0.3 [ 82.430430] device-mapper: ioctl: 4.39.0-ioctl (2018-04-03) initialised: dm-devel@redhat.com [ 108.196397] md/raid1:md0: not clean -- starting background reconstruction [ 108.196401] md/raid1:md0: active with 2 out of 2 mirrors [ 108.240395] md0: detected capacity change from 0 to 2000260497408 [ 110.076860] md: resync of RAID array md0 [ 110.385099] EXT4-fs (md0): recovery complete [ 110.431715] EXT4-fs (md0): mounted filesystem with ordered data mode. Opts: (null) [57744.301662] md: md0: resync done.