Wofür kann man dieses kleine niedliche Gerät denn sonst benutzen? ")
System
Ich nutze hier drauf ein Armbian. Danke für die Arbeit!
root@nanopi-r2s:/etc/init.d# uname -a
Linux nanopi-r2s 5.8.11-rockchip64 #20.08.4 SMP PREEMPT Wed Sep 23 17:51:13 CEST 2020 aarch64 GNU/Linux
Hardware
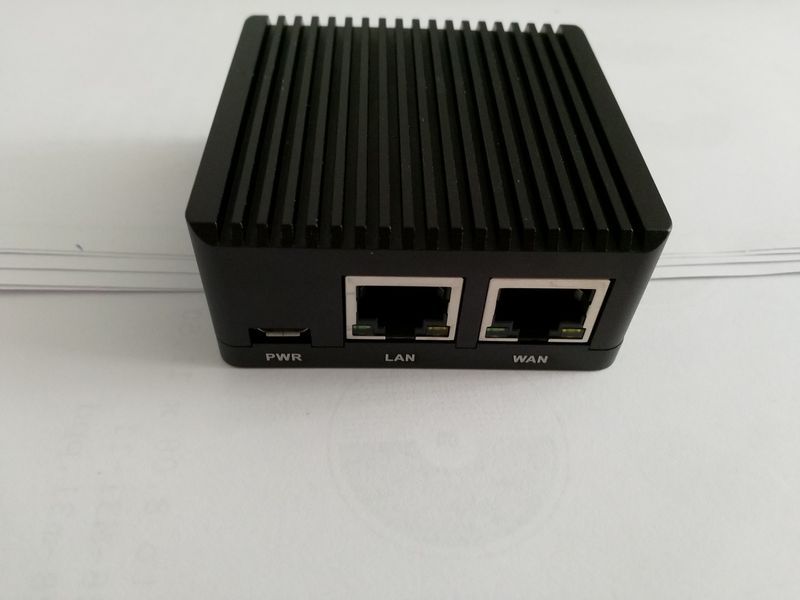
- NanoPI R2S
- Netgear GS108E
- paar Netzwerkkabel
")
Ich habe das schon mal auf einem ROCKPro64 gemacht -> https://forum.frank-mankel.org/topic/740/rockpro64-zwei-lan-schnittstellen-vlan-einrichten
Schnittstellen
- eth0 (holt sich per DHCP die IP-Adresse aus meinem Netzwerk
- lan0 (ist die Schnittstelle, die das VLan baut)
Software
Was brauchen wir?
Konfiguration
Schnittstellen
/etc/network/interfaces
source /etc/network/interfaces.d/*
# Network is managed by Network manager
auto lo
iface lo inet loopback

auto eth0
        iface eth0 inet dhcp


auto lan0.100
        iface lan0.100 inet static
        address 192.168.1.1
        netmask 255.255.255.0
        #gateway 192.168.0.1
        #dns-nameservers 8.8.8.8
    vlan-raw-device lan0

auto lan0.200
    iface lan0.200 inet static
    address 192.168.2.1
    netmask 255.255.255.0
    #gateway 192.168.0.1
    #dns-nameservers 8.8.8.8
    vlan-raw-device lan0
Wir bauen auf der lan0 zwei VLans. Im Switch ist das so konfiguriert.
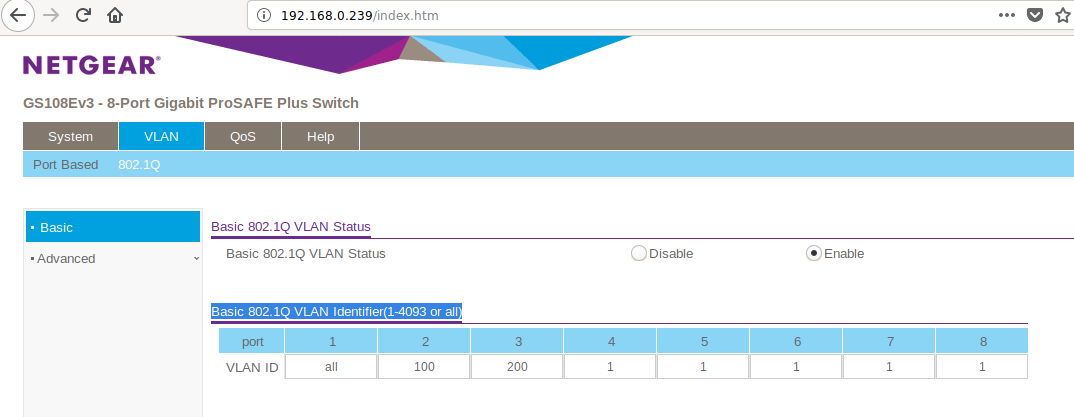
- Port 1 Uplink (kommt an lan0 vom R2S)
- Port 2 bildet das lan0.100
- Port 3 bildet das lan0.200
Danach brauchen wir iptables
iptables
Wir erzeugen in /etc/init.d eine Datei mit Namen firewall
#!/bin/sh
# This is a more complex setup, for a home firewall:
# * One interface plug to the ISP conection (eth0). Using DHCP.
# * One interface plug to the local LAN switch (eth1). Using 192.168.0.0/24.
# * Traffic open from the LAN to the SSH in the firewall.
# * Traffic open and translated, from the local LAN to internet.
# * Traffic open from internet, to a local web server.
# * Logging of dropped traffic, using a specific ''log level'' to configure a separate file in syslog/rsyslog.

PATH='/sbin'

## Network
INNET="192.168.1.0/24"
IN_NET2="192.168.2.0/24"

OUTNET="192.168.3.0/24"

INIF="lan0.100"
IN_IF2="lan0.200"

OUTIF="eth0"


## INIT

# Flush previous rules, delete chains and reset counters
iptables -F
iptables -X
iptables -Z
iptables -t nat -F

# Default policies
iptables -P INPUT DROP
iptables -P OUTPUT DROP
iptables -P FORWARD DROP

echo -n '1' > /proc/sys/net/ipv4/ip_forward
echo -n '0' > /proc/sys/net/ipv4/conf/all/accept_source_route
echo -n '0' > /proc/sys/net/ipv4/conf/all/accept_redirects
echo -n '1' > /proc/sys/net/ipv4/icmp_echo_ignore_broadcasts
echo -n '1' > /proc/sys/net/ipv4/icmp_ignore_bogus_error_responses

# Enable loopback traffic
iptables -A INPUT -i lo -j ACCEPT
iptables -A OUTPUT -o lo -j ACCEPT

# Enable statefull rules (after that, only need to allow NEW conections)
iptables -A INPUT -m conntrack --ctstate ESTABLISHED,RELATED -j ACCEPT
iptables -A OUTPUT -m conntrack --ctstate ESTABLISHED,RELATED -j ACCEPT
iptables -A FORWARD -m conntrack --ctstate ESTABLISHED,RELATED -j ACCEPT


# Drop invalid state packets
iptables -A INPUT -m conntrack --ctstate INVALID -j DROP
iptables -A OUTPUT -m conntrack --ctstate INVALID -j DROP
iptables -A FORWARD -m conntrack --ctstate INVALID -j DROP

## INPUT

# Incoming ssh from the LAN
iptables -A INPUT -i $INIF -s ${INNET} -p tcp --dport 22 -m conntrack --ctstate NEW -j ACCEPT

# TEST Please remove!!
iptables -A INPUT -i $OUTIF -s ${OUTNET} -p tcp --dport 22 -m conntrack --ctstate NEW -j ACCEPT

# Allow any connection from this host.
iptables -A INPUT -i lo -j ACCEPT

# Allow any connection from the local network.
iptables -A INPUT -s ${INNET} -j ACCEPT
iptables -A INPUT -s ${IN_NET2} -j ACCEPT

# Allow all broadcast traffic.
iptables -A INPUT -m pkttype --pkt-type broadcast -j ACCEPT


## OUTPUT

# Enable al outgoing traffic to internet
iptables -A OUTPUT -o $OUTIF -d ${OUTNET} -j ACCEPT

# Enable access traffic, from the firewall to the LAN network
iptables -A OUTPUT -o $INIF -d ${INNET} -j ACCEPT
iptables -A OUTPUT -o $IN_IF2 -d ${IN_NET2} -j ACCEPT

## FORWARD

# We have dynamic IP (DHCP), so we've to masquerade
iptables -t nat -A POSTROUTING -o $OUTIF -j MASQUERADE
iptables -A FORWARD -o $OUTIF -i $INIF -s ${INNET} -m conntrack --ctstate NEW -j ACCEPT
iptables -A FORWARD -o $OUTIF -i $IN_IF2 -s ${IN_NET2} -m conntrack --ctstate NEW -j ACCEPT

## LOGGING

iptables -A INPUT -j LOG --log-level 4 --log-prefix '[FW INPUT]: '
iptables -A OUTPUT -j LOG --log-level 4 --log-prefix '[FW OUTPUT]: '
iptables -A FORWARD -j LOG --log-level 4 --log-prefix '[FW FORWARD ]: '
Das führen wir nun aus und sollten in der Lage sein, wenn man sich ein passende IP gibt, am Port 2 oder Port 3 eine Verbindung ins Netz zu bekommen.
Jetzt etwas praktischer gestalten mit DHCP
DHCP-Server
Installation mit
apt install isc-dhcp-server
Danach gibt es zwei Dateien, die interessant sind.
- /etc/default/isc-dhcp-server
- /etc/dhcp/dhcpd.conf
/etc/default/isc-dhcp-server
# Defaults for isc-dhcp-server (sourced by /etc/init.d/isc-dhcp-server)

# Path to dhcpd's config file (default: /etc/dhcp/dhcpd.conf).
#DHCPDv4_CONF=/etc/dhcp/dhcpd.conf
#DHCPDv6_CONF=/etc/dhcp/dhcpd6.conf

# Path to dhcpd's PID file (default: /var/run/dhcpd.pid).
#DHCPDv4_PID=/var/run/dhcpd.pid
#DHCPDv6_PID=/var/run/dhcpd6.pid

# Additional options to start dhcpd with.
#       Don't use options -cf or -pf here; use DHCPD_CONF/ DHCPD_PID instead
#OPTIONS=""

# On what interfaces should the DHCP server (dhcpd) serve DHCP requests?
#       Separate multiple interfaces with spaces, e.g. "eth0 eth1".
INTERFACESv4="lan0.100 lan0.200"
#INTERFACESv6=""
Hier geben wir unsere beiden VLans an, auf diesen werden dann IP-Adressen mittels DHCP verteilt.
/etc/dhcp/dhcpd.conf
subnet 192.168.1.0 netmask 255.255.255.0 {
 option subnet-mask 255.255.255.0;
 option broadcast-address 192.168.1.255;
 option routers 192.168.1.1;
 option domain-name-servers 192.168.3.1, 1.1.1.1;
 range 192.168.1.10 192.168.1.100;
 }

 subnet 192.168.2.0 netmask 255.255.255.0 {
 option subnet-mask 255.255.255.0;
 option broadcast-address 192.168.2.255;
 option routers 192.168.2.1;
 option domain-name-servers 192.168.3.1, 1.1.1.1;
 range 192.168.2.10 192.168.2.100;
 }
Hier stellen wir ein, welche IP-Adressen verteilt werden sollen. Die Router-Adresse, der DNS-Server usw. Sollte selbsterklärend sein. Danach sollte unsere kleine Firewall fertig sein
Der DHCP-Server ist immer eine kleine Zicke. Schaut nach ob er läuft.
service isc-dhcp-server status
Ab und zu, war es bei mir auch nötig, das PID-File zu löschen.
rm /var/run/dhcpd.pid
Aber wenn alles passt, sollte er auch problemlos starten.
Firewall Autostart
Erst wenn alles funktioniert, starten wir iptables automatisch! In
/etc/rc.local
kommt folgendes rein
#!/bin/sh
#
# rc.local
#
# This script is executed at the end of each multiuser runlevel.
# Make sure that the script will "exit 0" on success or any other
# value on error.
#
# In order to enable or disable this script just change the execution
# bits.
#
# By default this script does nothing.

set -e

# Launch my netfilter rules
if [ -e '/etc/init.d/firewall' ]
then
/bin/sh '/etc/init.d/firewall'
fi

exit 0
Danach sollte der R2S nach einem Restart alles von alleine starten!
