Mal ein Screenshot von den Temperaturen mit OpenWrt.
d086e090-9c05-4a9d-8a86-fcf5d423d4f6-grafik.png
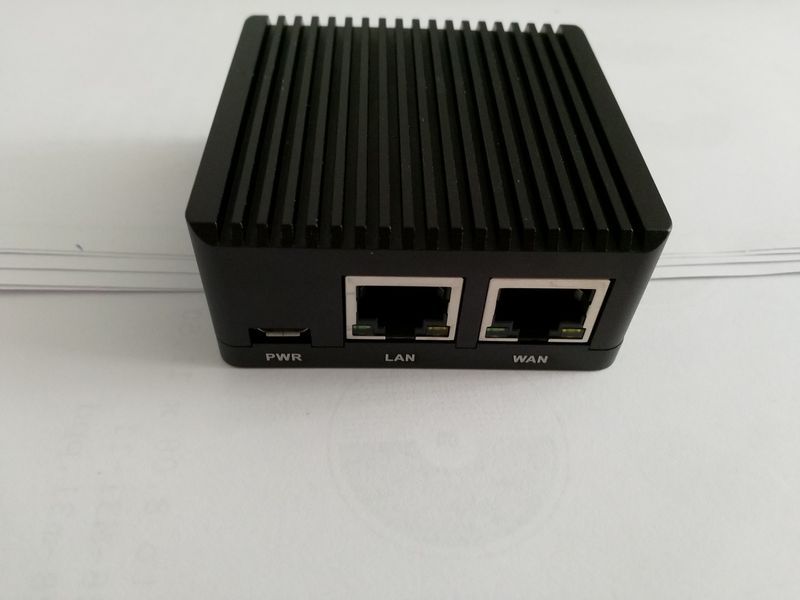
Wofür kann man dieses kleine niedliche Gerät denn sonst benutzen? ")
Ich nutze hier drauf ein Armbian. Danke für die Arbeit!
root@nanopi-r2s:/etc/init.d# uname -a
Linux nanopi-r2s 5.8.11-rockchip64 #20.08.4 SMP PREEMPT Wed Sep 23 17:51:13 CEST 2020 aarch64 GNU/Linux
")
Ich habe das schon mal auf einem ROCKPro64 gemacht -> https://forum.frank-mankel.org/topic/740/rockpro64-zwei-lan-schnittstellen-vlan-einrichten
Was brauchen wir?
/etc/network/interfaces
source /etc/network/interfaces.d/*
# Network is managed by Network manager
auto lo
iface lo inet loopback

auto eth0
        iface eth0 inet dhcp


auto lan0.100
        iface lan0.100 inet static
        address 192.168.1.1
        netmask 255.255.255.0
        #gateway 192.168.0.1
        #dns-nameservers 8.8.8.8
    vlan-raw-device lan0

auto lan0.200
    iface lan0.200 inet static
    address 192.168.2.1
    netmask 255.255.255.0
    #gateway 192.168.0.1
    #dns-nameservers 8.8.8.8
    vlan-raw-device lan0
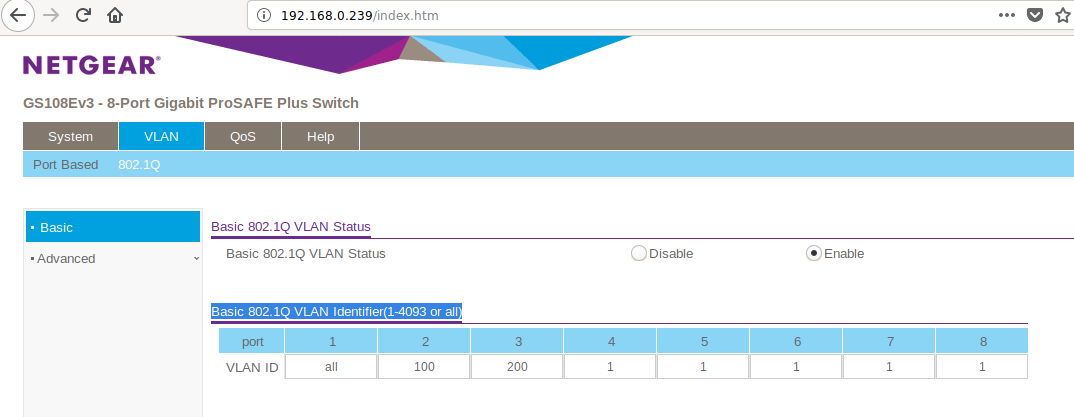
Wir bauen auf der lan0 zwei VLans. Im Switch ist das so konfiguriert.
Danach brauchen wir iptables
Wir erzeugen in /etc/init.d eine Datei mit Namen firewall
#!/bin/sh
# This is a more complex setup, for a home firewall:
# * One interface plug to the ISP conection (eth0). Using DHCP.
# * One interface plug to the local LAN switch (eth1). Using 192.168.0.0/24.
# * Traffic open from the LAN to the SSH in the firewall.
# * Traffic open and translated, from the local LAN to internet.
# * Traffic open from internet, to a local web server.
# * Logging of dropped traffic, using a specific ''log level'' to configure a separate file in syslog/rsyslog.

PATH='/sbin'

## Network
INNET="192.168.1.0/24"
IN_NET2="192.168.2.0/24"

OUTNET="192.168.3.0/24"

INIF="lan0.100"
IN_IF2="lan0.200"

OUTIF="eth0"


## INIT

# Flush previous rules, delete chains and reset counters
iptables -F
iptables -X
iptables -Z
iptables -t nat -F

# Default policies
iptables -P INPUT DROP
iptables -P OUTPUT DROP
iptables -P FORWARD DROP

echo -n '1' > /proc/sys/net/ipv4/ip_forward
echo -n '0' > /proc/sys/net/ipv4/conf/all/accept_source_route
echo -n '0' > /proc/sys/net/ipv4/conf/all/accept_redirects
echo -n '1' > /proc/sys/net/ipv4/icmp_echo_ignore_broadcasts
echo -n '1' > /proc/sys/net/ipv4/icmp_ignore_bogus_error_responses

# Enable loopback traffic
iptables -A INPUT -i lo -j ACCEPT
iptables -A OUTPUT -o lo -j ACCEPT

# Enable statefull rules (after that, only need to allow NEW conections)
iptables -A INPUT -m conntrack --ctstate ESTABLISHED,RELATED -j ACCEPT
iptables -A OUTPUT -m conntrack --ctstate ESTABLISHED,RELATED -j ACCEPT
iptables -A FORWARD -m conntrack --ctstate ESTABLISHED,RELATED -j ACCEPT


# Drop invalid state packets
iptables -A INPUT -m conntrack --ctstate INVALID -j DROP
iptables -A OUTPUT -m conntrack --ctstate INVALID -j DROP
iptables -A FORWARD -m conntrack --ctstate INVALID -j DROP

## INPUT

# Incoming ssh from the LAN
iptables -A INPUT -i $INIF -s ${INNET} -p tcp --dport 22 -m conntrack --ctstate NEW -j ACCEPT

# TEST Please remove!!
iptables -A INPUT -i $OUTIF -s ${OUTNET} -p tcp --dport 22 -m conntrack --ctstate NEW -j ACCEPT

# Allow any connection from this host.
iptables -A INPUT -i lo -j ACCEPT

# Allow any connection from the local network.
iptables -A INPUT -s ${INNET} -j ACCEPT
iptables -A INPUT -s ${IN_NET2} -j ACCEPT

# Allow all broadcast traffic.
iptables -A INPUT -m pkttype --pkt-type broadcast -j ACCEPT


## OUTPUT

# Enable al outgoing traffic to internet
iptables -A OUTPUT -o $OUTIF -d ${OUTNET} -j ACCEPT

# Enable access traffic, from the firewall to the LAN network
iptables -A OUTPUT -o $INIF -d ${INNET} -j ACCEPT
iptables -A OUTPUT -o $IN_IF2 -d ${IN_NET2} -j ACCEPT

## FORWARD

# We have dynamic IP (DHCP), so we've to masquerade
iptables -t nat -A POSTROUTING -o $OUTIF -j MASQUERADE
iptables -A FORWARD -o $OUTIF -i $INIF -s ${INNET} -m conntrack --ctstate NEW -j ACCEPT
iptables -A FORWARD -o $OUTIF -i $IN_IF2 -s ${IN_NET2} -m conntrack --ctstate NEW -j ACCEPT

## LOGGING

iptables -A INPUT -j LOG --log-level 4 --log-prefix '[FW INPUT]: '
iptables -A OUTPUT -j LOG --log-level 4 --log-prefix '[FW OUTPUT]: '
iptables -A FORWARD -j LOG --log-level 4 --log-prefix '[FW FORWARD ]: '
Das führen wir nun aus und sollten in der Lage sein, wenn man sich ein passende IP gibt, am Port 2 oder Port 3 eine Verbindung ins Netz zu bekommen.
Jetzt etwas praktischer gestalten mit DHCP
Installation mit
apt install isc-dhcp-server
Danach gibt es zwei Dateien, die interessant sind.
/etc/default/isc-dhcp-server
# Defaults for isc-dhcp-server (sourced by /etc/init.d/isc-dhcp-server)

# Path to dhcpd's config file (default: /etc/dhcp/dhcpd.conf).
#DHCPDv4_CONF=/etc/dhcp/dhcpd.conf
#DHCPDv6_CONF=/etc/dhcp/dhcpd6.conf

# Path to dhcpd's PID file (default: /var/run/dhcpd.pid).
#DHCPDv4_PID=/var/run/dhcpd.pid
#DHCPDv6_PID=/var/run/dhcpd6.pid

# Additional options to start dhcpd with.
#       Don't use options -cf or -pf here; use DHCPD_CONF/ DHCPD_PID instead
#OPTIONS=""

# On what interfaces should the DHCP server (dhcpd) serve DHCP requests?
#       Separate multiple interfaces with spaces, e.g. "eth0 eth1".
INTERFACESv4="lan0.100 lan0.200"
#INTERFACESv6=""
Hier geben wir unsere beiden VLans an, auf diesen werden dann IP-Adressen mittels DHCP verteilt.
/etc/dhcp/dhcpd.conf
subnet 192.168.1.0 netmask 255.255.255.0 {
 option subnet-mask 255.255.255.0;
 option broadcast-address 192.168.1.255;
 option routers 192.168.1.1;
 option domain-name-servers 192.168.3.1, 1.1.1.1;
 range 192.168.1.10 192.168.1.100;
 }

 subnet 192.168.2.0 netmask 255.255.255.0 {
 option subnet-mask 255.255.255.0;
 option broadcast-address 192.168.2.255;
 option routers 192.168.2.1;
 option domain-name-servers 192.168.3.1, 1.1.1.1;
 range 192.168.2.10 192.168.2.100;
 }
Hier stellen wir ein, welche IP-Adressen verteilt werden sollen. Die Router-Adresse, der DNS-Server usw. Sollte selbsterklärend sein. Danach sollte unsere kleine Firewall fertig sein
Der DHCP-Server ist immer eine kleine Zicke. Schaut nach ob er läuft.
service isc-dhcp-server status
Ab und zu, war es bei mir auch nötig, das PID-File zu löschen.
rm /var/run/dhcpd.pid
Aber wenn alles passt, sollte er auch problemlos starten.
Erst wenn alles funktioniert, starten wir iptables automatisch! In
/etc/rc.local
kommt folgendes rein
#!/bin/sh
#
# rc.local
#
# This script is executed at the end of each multiuser runlevel.
# Make sure that the script will "exit 0" on success or any other
# value on error.
#
# In order to enable or disable this script just change the execution
# bits.
#
# By default this script does nothing.

set -e

# Launch my netfilter rules
if [ -e '/etc/init.d/firewall' ]
then
/bin/sh '/etc/init.d/firewall'
fi

exit 0
Danach sollte der R2S nach einem Restart alles von alleine starten!
Im Fediverse -> @FrankM@nrw.social
Nachdem ich die Tage feststellen musste, das irgendwas mit dem Gerät nicht stimmte, bekam keine DNS Auflösung über die Konsole, habe ich das heute mal eben neuinstalliert.
Armbian ist ja immer was spezielles Hat sich bis heute nix dran geändert.....
Ok, dann heute mal eben ein neues Image erstellt. Download Gewählt habe ich das Armbian Buster.
Image auf die SD-Karte, eingeloggt. Alles wie oben erstellt und abgespeichert. Neustart, geht wieder alles. 
root@192.168.3.15's password:
 _   _                         _   ____  ____  ____
| \ | | __ _ _ __   ___  _ __ (_) |  _ \|___ \/ ___|
|  \| |/ _` | '_ \ / _ \| '_ \| | | |_) | __) \___ \
| |\  | (_| | | | | (_) | |_) | | |  _ < / __/ ___) |
|_| \_|\__,_|_| |_|\___/| .__/|_| |_| \_\_____|____/
                        |_|
Welcome to Debian GNU/Linux 10 (buster) with Linux 5.9.11-rockchip64

System load:   2%           	Up time:       11 min
Memory usage:  10% of 978M   	IP:            192.168.3.15 192.168.1.1 192.168.2.1
CPU temp:      61°C           	Usage of /:    5% of 29G

Last login: Sun Dec  6 12:28:10 2020 from 192.168.3.213
root@nanopi-r2s:~# uname -a
 Linux nanopi-r2s 5.9.11-rockchip64 #20.11.1 SMP PREEMPT Fri Nov 27 21:59:08 CET 2020 aarch64 GNU/Linux
oot@nanopi-r2s:~# ip a
1: lo: <LOOPBACK,UP,LOWER_UP> mtu 65536 qdisc noqueue state UNKNOWN group default qlen 1000
    link/loopback 00:00:00:00:00:00 brd 00:00:00:00:00:00
    inet 127.0.0.1/8 scope host lo
       valid_lft forever preferred_lft forever
    inet6 ::1/128 scope host
       valid_lft forever preferred_lft forever
2: eth0: <BROADCAST,MULTICAST,UP,LOWER_UP> mtu 1500 qdisc mq state UP group default qlen 1000
    link/ether b2:b5:10:38:9e:76 brd ff:ff:ff:ff:ff:ff
    inet 192.168.3.15/24 brd 192.168.3.255 scope global dynamic eth0
       valid_lft 6360sec preferred_lft 6360sec
    inet6 2a02:908:xxxxxx/64 scope global dynamic mngtmpaddr
       valid_lft 7196sec preferred_lft 596sec
    inet6 fe80::b0b5:10ff:fe38:9e76/64 scope link
       valid_lft forever preferred_lft forever
3: lan0: <BROADCAST,MULTICAST,UP,LOWER_UP> mtu 1500 qdisc pfifo_fast state UP group default qlen 1000
    link/ether b2:b5:10:38:9e:96 brd ff:ff:ff:ff:ff:ff
4: lan0.100@lan0: <BROADCAST,MULTICAST,UP,LOWER_UP> mtu 1500 qdisc noqueue state UP group default qlen 1000
    link/ether b2:b5:10:38:9e:96 brd ff:ff:ff:ff:ff:ff
    inet 192.168.1.1/24 brd 192.168.1.255 scope global lan0.100
       valid_lft forever preferred_lft forever
    inet6 fe80::b0b5:10ff:fe38:9e96/64 scope link
       valid_lft forever preferred_lft forever
5: lan0.200@lan0: <BROADCAST,MULTICAST,UP,LOWER_UP> mtu 1500 qdisc noqueue state UP group default qlen 1000
    link/ether b2:b5:10:38:9e:96 brd ff:ff:ff:ff:ff:ff
    inet 192.168.2.1/24 brd 192.168.2.255 scope global lan0.200
       valid_lft forever preferred_lft forever
    inet6 fe80::b0b5:10ff:fe38:9e96/64 scope link
       valid_lft forever preferred_lft forever
Vom Notebook aus funktioniert auch alles. So weit bin ich zufrieden. Jetzt mal langsam anfangen, der Kiste IPv6 beizubringen. Oje, nicht gerade mein Lieblingsthema...
Bis der NanoPi R4S hier ankommt und ein vernünftiges Image hat, vergeht ja noch was Zeit...