@thrakath1980 Ok, du meinst die FriendlyArm Variante von OpenWRT. Ich denke, da sollte man besser alles neu machen. Leider ist das bei OpenWRT nicht so einfach zu updaten/upgraden wie z.B. bei einem Linux Kernel. Ich habe es mal runtergeladen, wenn ich mal Zeit habe, schau ich mal rein.
ROCKPro64 - Debian Bullseye Teil 1
-
Ich wollte gerade eine Installation auf einer PCIe SATA-Karte testen, da meckert die Installation über Kernel-Module die fehlen. Grund ist wohl mein zu altes Image! Also merken, immer ein aktuelles bauen zum Testen!
Ein paar Gedanken von heute nachmittag.
- Die Installation auf der PCIe SATA-Karte war erfolgreich.
- Ein Booten von der SSD war erfolglos
Interessanterweise taucht beim Updaten dann irgendwoher dieses File auf
/dtbs/5.7.0-1-arm64Warum wird das dann nicht bei der Installation mit angelegt? Da sind noch so einige DDinge, die mir nicht vollständig klar sind. Mal etwas intensiver reinschauen und evt. mal auf der Mailingliste nachfragen.
-
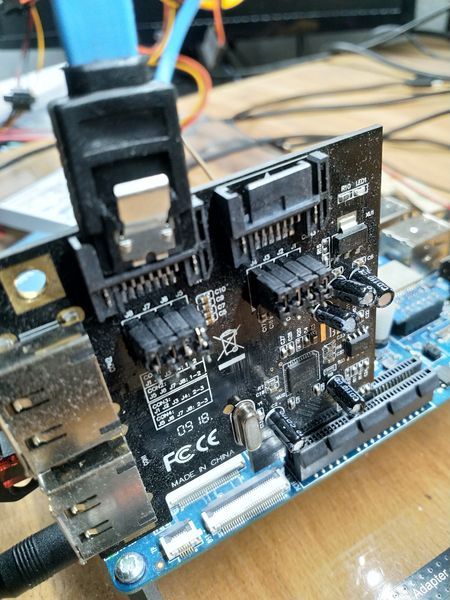
Heute habe ich mal die PCIe SATA ASM1062 (die Karte, die im Pine Shop verkauft wird) genommen und geschaut, ob die Installation von gestern startet.
Jo, macht sie
")
root@debian:~# uname -a
Linux debian 5.7.0-1-arm64 #1 SMP Debian 5.7.6-1 (2020-06-24) aarch64 GNU/Linux

root@debian:~# df -h
Filesystem                   Size  Used Avail Use% Mounted on
udev                         913M     0  913M   0% /dev
tmpfs                        193M  784K  192M   1% /run
/dev/mapper/debian--vg-root  218G  883M  206G   1% /
tmpfs                        963M     0  963M   0% /dev/shm
tmpfs                        5.0M     0  5.0M   0% /run/lock
tmpfs                        963M     0  963M   0% /sys/fs/cgroup
/dev/sda1                    472M   61M  388M  14% /boot
tmpfs                        193M     0  193M   0% /run/user/1000

root@debian:~# lspci
00:00.0 PCI bridge: Fuzhou Rockchip Electronics Co., Ltd RK3399 PCI Express Root Port
01:00.0 SATA controller: ASMedia Technology Inc. ASM1062 Serial ATA Controller (rev 02)
Eine anderere PCIe SATA Karte, Marvell 88SE9230, hat gestern die Installation nicht gestartet.
Die Installation ist auf einer 240GB SSD. Auf die vorhandene Installation, habe ich die oben aufgelisteten Dateien kopiert.
-
Heute mal schnell den Installer am HDMI Ausgang getestet. Rat von mir - Aktuell nicht nutzbar. Da ich den Debian Installer mittlerweile fas blind bedienen kann, weiß ich wann ich was drücken muss.
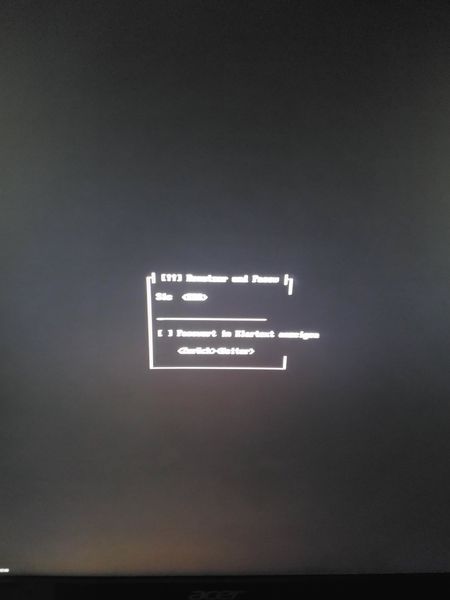
Leider schlecht geworden das Foto. Da steht
Sie <ERR>An dieser Stelle möchte er das Passwort für Root haben. Das taucht so an vielen Stellen noch auf. Ich war aber in der Lage die Installation zu beenden. Und nach den bekannten Änderungen startete die Installation auch.
Also, so als Fazit.
- Nur über die UART-Schnittstelle installieren
- Nur über die UART-Schnittstelle, kann das PW für eine verschlüsselte Partition eingegeben werden.
- Ordner dtbs und extlinux vom Kamil kopieren!
- extlinux.config anpassen (root=/dev/debian-vg/root)
- extlinux.config kernel und initrd anpassen!
Ich werde noch eine ausführliche Anleitung schreiben, und dann auch mit Anpassungen wie wir uns das Leben danach einfacher gestalten können.
-
@FrankM sagte in ROCKPro64 - Debian Bullseye Teil 1:
...
Jetzt muss ich nur nochmal nachschauen, wie Kamil das automatisch macht, wenn der installiert wird!?
Hallo FrankM, in '/etc/kernel/postinst.d/' bzw. '/etc/kernel/postrm.d' liegen die Skript, die bei der Installation oder dem Entfernen eines kernel Pakets gestartet werden.
Wenn man also das Skript von Kamil da rein legt, sollte es automatisch funktionieren. Habe ich aber noch nicht getestet . In '/etc/kernel-img.conf' kann man auch noch andere Sachen konfigurieren (wenn gewünscht, oder nicht).
 -
Irgendwie fehlen ja zur Zeit, die benötigten Files.
Ok, dann mal nachfragen. EMail an debian-arm@lists.debian.org und folgende Antwort bekommen.
The daily images are frequently broken like this after a new kernel upload since the debian-installer sources are looking for the old kernel (which no longer exists), it has to be manually updated to build for the new one. It usually gets done in a few days.
Ok, jetzt bin ich schlauer
-
@gabs5807 sagte in ROCKPro64 - Debian Bullseye Teil 1:
Hallo FrankM, in '/etc/kernel/postinst.d/' bzw. '/etc/kernel/postrm.d' liegen die Skript, die bei der Installation oder dem Entfernen eines kernel Pakets gestartet werden.
Wenn man also das Skript von Kamil da rein legt, sollte es automatisch funktionieren. Habe ich aber noch nicht getestet . In '/etc/kernel-img.conf' kann man auch noch andere Sachen konfigurieren (wenn gewünscht, oder nicht).Hallo @gabs5807 , heute beim Updaten der Installation ist mir aufgefallen, das er zwar neue Kernel installiert diese aber nicht benutzt. Da ist mir doch deine Antwort eingefallen
")
Es gibt folgendes Dateien, die dafür nötig sind
- /etc/kernel/postinst.d/zz-update-extlinux
- /etc/default/extlinux
- /usr/local/sbin/update-extlinux.sh
Inhalte
/etc/kernel/postinst.d/zz-update-extlinux
#!/bin/bash

exec /usr/local/sbin/update-extlinux.sh
/etc/default/extlinux
# Configure timeout to choose the kernel
# TIMEOUT="10"

# Configure default kernel to boot: check all kernels in `/boot/extlinux/extlinux.conf`
# DEFAULT="kernel-4.4.126-rockchip-ayufan-253"

# Configure additional kernel configuration options
APPEND="$APPEND root=LABEL=linux-root rootwait rootfstype=ext4"
/usr/local/sbin/update-extlinux.sh
#!/bin/bash

TIMEOUT=""
DEFAULT=""
APPEND="rw"
APPEND="$APPEND panic=10"
APPEND="$APPEND init=/sbin/init"
APPEND="$APPEND coherent_pool=1M"
APPEND="$APPEND ethaddr=\${ethaddr} eth1addr=\${eth1addr} serial=\${serial#}"
APPEND="$APPEND cgroup_enable=cpuset cgroup_memory=1 cgroup_enable=memory swapaccount=1"

set -eo pipefail

. /etc/default/extlinux

echo "Creating new extlinux.conf..." 1>&2

mkdir -p /boot/extlinux/
exec 1> /boot/extlinux/extlinux.conf.new

echo "timeout ${TIMEOUT:-10}"
echo "menu title select kernel"
[[ -n "$DEFAULT" ]] && echo "default $DEFAULT"
echo ""

emit_kernel() {
  local VERSION="$1"
  local APPEND="$2"
  local NAME="$3"

  echo "label kernel-$VERSION$NAME"
  echo "    kernel $MOUNT_PREFIX/vmlinuz-$VERSION"
  if [[ -f "/boot/initrd.img-$VERSION" ]]; then
    echo "    initrd $MOUNT_PREFIX/initrd.img-$VERSION"
  fi
  if [[ -f "/boot/dtb-$VERSION" ]]; then
    echo "    fdt $MOUNT_PREFIX/dtb-$VERSION"
  else
    if [[ ! -d "/boot/dtbs/$VERSION" ]]; then
      mkdir -p /boot/dtbs
      cp -au "/usr/lib/linux-image-$VERSION" "/boot/dtbs/$VERSION"
    fi
    echo "    devicetreedir $MOUNT_PREFIX/dtbs/$VERSION"
  fi
  echo "    append $APPEND"
  echo ""
}

if findmnt /boot >/dev/null; then
  # If we have `/boot` the files are in `/`
  MOUNT_PREFIX=
else
  # If we don't have `/boot` mount the files are in `/boot`
  MOUNT_PREFIX=/boot
fi

linux-version list | linux-version sort --reverse | while read VERSION; do
  emit_kernel "$VERSION" "$APPEND"
  emit_kernel "$VERSION" "$APPEND memtest" "-memtest"
done

exec 1<&-

echo "Installing new extlinux.conf..." 1>&2
mv /boot/extlinux/extlinux.conf.new /boot/extlinux/extlinux.conf
Wenn ich jetzt diese Dateien alle anlegen und dann das Script zz-update-extlinux aufrufe, passiert folgendes.
root@debian:/etc/kernel/postinst.d# ./zz-update-extlinux
Creating new extlinux.conf...
Installing new extlinux.conf...
Die neue extlinux.conf sieht dann so aus.
timeout 10
menu title select kernel

label kernel-5.8.0-1-arm64
    kernel /vmlinuz-5.8.0-1-arm64
    initrd /initrd.img-5.8.0-1-arm64
    devicetreedir /dtbs/5.8.0-1-arm64
    append rw panic=10 init=/sbin/init coherent_pool=1M ethaddr=${ethaddr} eth1addr=${eth1addr} serial=${serial#} cgroup_enable=cpuset cgroup_memory=1 cgroup_enable=memory swapaccount=1 root=LABEL=linux-root rootwait rootfstype=ext4

label kernel-5.8.0-1-arm64-memtest
    kernel /vmlinuz-5.8.0-1-arm64
    initrd /initrd.img-5.8.0-1-arm64
    devicetreedir /dtbs/5.8.0-1-arm64
    append rw panic=10 init=/sbin/init coherent_pool=1M ethaddr=${ethaddr} eth1addr=${eth1addr} serial=${serial#} cgroup_enable=cpuset cgroup_memory=1 cgroup_enable=memory swapaccount=1 root=LABEL=linux-root rootwait rootfstype=ext4 memtest

label kernel-5.7.0-3-arm64
    kernel /vmlinuz-5.7.0-3-arm64
    initrd /initrd.img-5.7.0-3-arm64
    devicetreedir /dtbs/5.7.0-3-arm64
    append rw panic=10 init=/sbin/init coherent_pool=1M ethaddr=${ethaddr} eth1addr=${eth1addr} serial=${serial#} cgroup_enable=cpuset cgroup_memory=1 cgroup_enable=memory swapaccount=1 root=LABEL=linux-root rootwait rootfstype=ext4

label kernel-5.7.0-3-arm64-memtest
    kernel /vmlinuz-5.7.0-3-arm64
    initrd /initrd.img-5.7.0-3-arm64
    devicetreedir /dtbs/5.7.0-3-arm64
    append rw panic=10 init=/sbin/init coherent_pool=1M ethaddr=${ethaddr} eth1addr=${eth1addr} serial=${serial#} cgroup_enable=cpuset cgroup_memory=1 cgroup_enable=memory swapaccount=1 root=LABEL=linux-root rootwait rootfstype=ext4 memtest

label kernel-5.7.0-2-arm64
    kernel /vmlinuz-5.7.0-2-arm64
    initrd /initrd.img-5.7.0-2-arm64
    devicetreedir /dtbs/5.7.0-2-arm64
    append rw panic=10 init=/sbin/init coherent_pool=1M ethaddr=${ethaddr} eth1addr=${eth1addr} serial=${serial#} cgroup_enable=cpuset cgroup_memory=1 cgroup_enable=memory swapaccount=1 root=LABEL=linux-root rootwait rootfstype=ext4

label kernel-5.7.0-2-arm64-memtest
    kernel /vmlinuz-5.7.0-2-arm64
    initrd /initrd.img-5.7.0-2-arm64
    devicetreedir /dtbs/5.7.0-2-arm64
    append rw panic=10 init=/sbin/init coherent_pool=1M ethaddr=${ethaddr} eth1addr=${eth1addr} serial=${serial#} cgroup_enable=cpuset cgroup_memory=1 cgroup_enable=memory swapaccount=1 root=LABEL=linux-root rootwait rootfstype=ext4 memtest

label kernel-5.7.0-1-arm64
    kernel /vmlinuz-5.7.0-1-arm64
    initrd /initrd.img-5.7.0-1-arm64
    devicetreedir /dtbs/5.7.0-1-arm64
    append rw panic=10 init=/sbin/init coherent_pool=1M ethaddr=${ethaddr} eth1addr=${eth1addr} serial=${serial#} cgroup_enable=cpuset cgroup_memory=1 cgroup_enable=memory swapaccount=1 root=LABEL=linux-root rootwait rootfstype=ext4

label kernel-5.7.0-1-arm64-memtest
    kernel /vmlinuz-5.7.0-1-arm64
    initrd /initrd.img-5.7.0-1-arm64
    devicetreedir /dtbs/5.7.0-1-arm64
    append rw panic=10 init=/sbin/init coherent_pool=1M ethaddr=${ethaddr} eth1addr=${eth1addr} serial=${serial#} cgroup_enable=cpuset cgroup_memory=1 cgroup_enable=memory swapaccount=1 root=LABEL=linux-root rootwait rootfstype=ext4 memtest
Damit bootet mein System aber nicht, da ich ja eine verschlüsselte Installation habe. Damit passt jetzt folgende Zeile nicht.
append rw panic=10 init=/sbin/init coherent_pool=1M ethaddr=${ethaddr} eth1addr=${eth1addr} serial=${serial#} cgroup_enable=cpuset cgroup_memory=1 cgroup_enable=memory swapaccount=1 root=LABEL=linux-root rootwait rootfstype=ext4Der Eintrag
root=LABEL=linux-rootpasst jetzt nicht. Ändern in
root=/dev/debian-vg/rootDanach bootet die Installation sauber mit folgendem Kernel.
root@debian:~# uname -a
Linux debian 5.8.0-1-arm64 #1 SMP Debian 5.8.7-1 (2020-09-05) aarch64 GNU/Linux
Um das nichtbooten jetzt für die Zukunft zu verhindern, ändere ich jetzt in /etc/default/extlinux folgende Zeile ab.
# Configure timeout to choose the kernel
# TIMEOUT="10"

# Configure default kernel to boot: check all kernels in `/boot/extlinux/extlinux.conf`
# DEFAULT="kernel-4.4.126-rockchip-ayufan-253"

# Configure additional kernel configuration options
#APPEND="$APPEND root=LABEL=linux-root rootwait rootfstype=ext4"
APPEND="$APPEND root=/dev/debian-vg/root rootwait rootfstype=ext4"
Damit sollte in Zukunft ein Kernel-Update sauber durchlaufen.
Mir fällt da noch ein, man könnte dem vg-root auch das LABEL=linux-root setzen. Da ich aktuell aber nicht weiß wie das geht, lasse ich das erst mal so.
-
Heute die Kiste mal nach längerer Zeit aktualisiert.
root@debian:~# apt upgrade
Reading package lists... Done
Building dependency tree
Reading state information... Done
Calculating upgrade... Done
The following packages were automatically installed and are no longer required:
  g++-9 libasync-mergepoint-perl libcdio18 libdc1394-22 libdigest-bubblebabble-perl libemail-valid-perl libfuture-perl libilmbase24 libio-async-loop-epoll-perl
  libio-async-perl liblinux-epoll-perl libmetrics-any-perl libmozjs-68-0 libmpdec2 libnet-dns-perl libnet-dns-sec-perl libnet-ip-perl libopenexr24 libpoppler95
  libraw19 libsereal-perl libsnmp35 libsrt1-openssl libstdc++-9-dev libstruct-dumb-perl libtest-fatal-perl libtest-metrics-any-perl libtest-refcount-perl
  libtext-levenshtein-perl libusrsctp1 libvulkan1 libx264-155 libx265-179 libxcb-randr0 libxml-writer-perl linux-image-5.7.0-2-arm64 mesa-vulkan-drivers
  mousetweaks
Use 'apt autoremove' to remove them.
The following NEW packages will be installed:
  gir1.2-gst-plugins-bad-1.0 gir1.2-handy-1 libdc1394-25 libmozjs-78-0 libsane1 libsnmp40 linux-image-5.8.0-2-arm64
The following packages have been kept back:
  guile-2.2-libs inkscape libpython2-stdlib libreoffice-base-core libreoffice-calc libreoffice-common libreoffice-core libreoffice-draw libreoffice-gnome
  libreoffice-gtk3 libreoffice-impress libreoffice-math libreoffice-writer python2 python2-minimal python3-uno
The following packages will be upgraded:
  binutils binutils-aarch64-linux-gnu binutils-common bluez bluez-obexd bsdextrautils bsdutils cheese cheese-common coreutils cpp cpp-10 cups-browsed cups-filters
  cups-filters-core-drivers debianutils eject fdisk ffmpeg firefox-esr fonts-noto-color-emoji four-in-a-row g++ g++-10 gcc gcc-10 gcc-10-base gcr gimp gimp-data
  gir1.2-freedesktop gir1.2-gdesktopenums-3.0 gir1.2-glib-2.0 gir1.2-gnomedesktop-3.0 gir1.2-gtk-3.0 gir1.2-gucharmap-2.90 gir1.2-javascriptcoregtk-4.0
  gir1.2-pango-1.0 gir1.2-peas-1.0 gir1.2-rb-3.0 gir1.2-soup-2.4 gir1.2-vte-2.91 gir1.2-webkit2-4.0 gjs glib-networking glib-networking-common
  glib-networking-services gnome-chess gnome-control-center gnome-control-center-data gnome-desktop3-data gnome-games gnome-mahjongg gnome-nibbles
  gnome-online-accounts gnome-settings-daemon gnome-settings-daemon-common gnome-sound-recorder gnome-user-docs gnote gsettings-desktop-schemas
  gstreamer1.0-clutter-3.0 gstreamer1.0-plugins-bad gtk-update-icon-cache gvfs gvfs-backends gvfs-common gvfs-daemons gvfs-fuse gvfs-libs hitori inxi
  keyboard-configuration libalgorithm-diff-perl libasan6 libatomic1 libavcodec58 libavdevice58 libavfilter7 libavformat58 libavresample4 libavutil56 libbinutils
  libblkid1 libbluetooth3 libcc1-0 libcheese-gtk25 libcheese8 libclutter-gst-3.0-0 libcpanel-json-xs-perl libctf-nobfd0 libctf0 libcupsfilters1 libde265-0
  libdebconfclient0 libegl-mesa0 libexpat1 libfdisk1 libfido2-1 libfile-listing-perl libfluidsynth2 libfontembed1 libfontenc1 libgail-3-0 libgbm1 libgcc-10-dev
  libgcc-s1 libgck-1-0 libgcr-base-3-1 libgcr-ui-3-1 libgdata-common libgdata22 libgfortran5 libgimp2.0 libgirepository-1.0-1 libgjs0g libgl1-mesa-dri
  libglapi-mesa libglx-mesa0 libgnome-bluetooth13 libgnome-desktop-3-19 libgoa-1.0-0b libgoa-1.0-common libgoa-backend-1.0-1 libgomp1 libgstreamer-plugins-bad1.0-0
  libgtk-3-0 libgtk-3-bin libgtk-3-common libgucharmap-2-90-7 libgudev-1.0-0 libgupnp-igd-1.0-4 libhandy-1-0 libheif1 libice6 libinput-bin libinput10 libitm1
  libjavascriptcoregtk-4.0-18 libkpathsea6 libllvm10 liblsan0 libmbim-glib4 libmbim-proxy libmount1 libmozjs-52-0 libmusicbrainz5-2 libmusicbrainz5cc2v5
  libmwaw-0.3-3 libncurses6 libncursesw6 libnet-dns-sec-perl libnss-mdns libnss-myhostname libnss-systemd libopenal-data libopenal1 libopus0 libpam-systemd
  libpango-1.0-0 libpangocairo-1.0-0 libpangoft2-1.0-0 libpangoxft-1.0-0 libpci3 libpeas-1.0-0 libpeas-common libphodav-2.0-0 libphodav-2.0-common libpostproc55
  libproxy1v5 libpython3.8 libpython3.8-minimal libpython3.8-stdlib librhythmbox-core10 librsvg2-2 librsvg2-common libruby2.7 libsane libsane-common libsdl2-2.0-0
  libseccomp2 libsmartcols1 libsnmp-base libsoup-gnome2.4-1 libsoup2.4-1 libstdc++-10-dev libstdc++6 libswresample3 libswscale5 libsynctex2 libsystemd0 libtinfo6
  libtsan0 libubsan1 libudev1 libuuid1 libvorbis0a libvorbisenc2 libvorbisfile3 libvte-2.91-0 libvte-2.91-common libwebkit2gtk-4.0-37 libwww-perl libxfont2
  libxmlsec1 libxmlsec1-nss libz3-4 lightsoff lintian linux-image-arm64 linux-libc-dev mesa-va-drivers mesa-vdpau-drivers mesa-vulkan-drivers mount ncurses-base
  ncurses-bin ncurses-term pci.ids pciutils python3-bs4 python3-debian python3-gi python3-gi-cairo python3-mako python3-numpy python3-pkg-resources python3-pycurl
  python3-xlib python3.8 python3.8-minimal rhythmbox rhythmbox-data rhythmbox-plugin-cdrecorder rhythmbox-plugins ruby2.7 sane-utils sudo systemd systemd-sysv
  systemd-timesyncd tali udev util-linux xserver-xorg-video-vesa xterm
246 upgraded, 7 newly installed, 0 to remove and 16 not upgraded.
Need to get 347 MB of archives.
After this operation, 302 MB of additional disk space will be used.
Do you want to continue? [Y/n]
Ja, ist was umfangreicher
Danach neugestartet, da ein neuer Kernel da war, konnte man mal schnell testen ob das jetzt einwandfrei funktioniert. Ich denke ja, ich hatte irgendein Problem beim Reboot, konnte leider nicht erkennen woran es lag. Mein Terminalfenster funktionierte leider erst nach dem Reboot wieder richtig.Ich habe danach aber noch mal geschaut, der Reboot geht einwandfrei. Denke, die Änderungen vom vorherigen Post passen so.
$ ssh frank@192.168.3.2 frank@192.168.3.2's password: Linux debian 5.8.0-2-arm64 #1 SMP Debian 5.8.10-1 (2020-09-19) aarch64 The programs included with the Debian GNU/Linux system are free software; the exact distribution terms for each program are described in the individual files in /usr/share/doc/*/copyright. Debian GNU/Linux comes with ABSOLUTELY NO WARRANTY, to the extent permitted by applicable law. -
Nach langer Zeit mal wieder ausprobiert.
LAN-Schnittstelle wird nicht erkannt

Mal auf der Mailingliste nachfragen..
-
Durch diesen Beitrag ist mir mal wieder eingefallen, das wir das erneut testen könnten
Also die aktuellen Daten von Debian gezogen. Das Image gebaut, könnt ihr alles hier im ersten Beitrag nachlesen. Da die eingebaute Netzwerkschnittstelle nicht erkannt wurde, habe ich mal wieder den USB-to-LAN Adapter eingesetzt.
Bus 005 Device 002: ID 0b95:1790 ASIX Electronics Corp. AX88179 Gigabit EthernetDie Installation wollte ich auf einem NVMe Riegel installieren.
Die Debian Installation durchgezogen und nach erfolgreicher Installation neugestartet. Und siehe da, ohne das man alles möglich ändern musste, bootete die NVMe SSD
Eingesetzter uboot -> 2020.01-ayufan-2013......
Die nicht erkannte LAN-Schnittstelle müsste an nicht freien Treibern liegen, hatte ich da irgendwo kurz gelesen. Beim Schreiben dieses Satzes kam die Nacht und ich konnte noch mal drüber schlafen. Heute Morgen, beim ersten Kaffee, dann noch mal logischer an die Sache ran gegangen.
Wir schauen uns mal die wichtigsten Dinge an.
root@debian:~# ip a
1: lo: <LOOPBACK,UP,LOWER_UP> mtu 65536 qdisc noqueue state UNKNOWN group default qlen 1000
    link/loopback 00:00:00:00:00:00 brd 00:00:00:00:00:00
    inet 127.0.0.1/8 scope host lo
       valid_lft forever preferred_lft forever
    inet6 ::1/128 scope host
       valid_lft forever preferred_lft forever
2: eth0: <BROADCAST,MULTICAST> mtu 1500 qdisc noop state DOWN group default qlen 1000
    link/ether 62:03:b0:d6:dc:b3 brd ff:ff:ff:ff:ff:ff
3: enx000acd26e2c8: <BROADCAST,MULTICAST,UP,LOWER_UP> mtu 1500 qdisc pfifo_fast state UP group default qlen 1000
    link/ether 00:0a:cd:26:e2:c8 brd ff:ff:ff:ff:ff:ff
    inet 192.168.3.208/24 brd 192.168.3.255 scope global dynamic enx000acd26e2c8
       valid_lft 42567sec preferred_lft 42567sec
    inet6 fd8a:6ff:2880:0:20a:cdff:fe26:e2c8/64 scope global dynamic mngtmpaddr
       valid_lft forever preferred_lft forever
    inet6 2a02:908:1260:13bc:20a:xxxx:xxxx:xxxx/64 scope global dynamic mngtmpaddr
       valid_lft 5426sec preferred_lft 1826sec
    inet6 fe80::20a:cdff:fe26:e2c8/64 scope link
       valid_lft forever preferred_lft forever
Ok, er zeigt mir die Schnittstelle eth0 ja an, dann kann es an fehlenden Treibern ja nicht liegen. Lässt dann auf eine fehlerhafte Konfiguration schließen. Nächster Halt wäre dann /etc/network/interfaces
Das trägt Debian ein
# This file describes the network interfaces available on your system
# and how to activate them. For more information, see interfaces(5).

source /etc/network/interfaces.d/*

# The loopback network interface
auto lo
iface lo inet loopback

# The primary network interface
allow-hotplug enx000acd26e2c8

iface enx000acd26e2c8 inet dhcp

# This is an autoconfigured IPv6 interface
iface enx000acd26e2c8 inet6 auto
Gut, bei der Installation hat Debian ja nur die zusätzliche Netzwerkschnittstelle erkannt, folgerichtig ist die auch als primäre Schnittstelle eingetragen. Dann ändern wir das mal...
# This file describes the network interfaces available on your system
# and how to activate them. For more information, see interfaces(5).

source /etc/network/interfaces.d/*

# The loopback network interface
auto lo
iface lo inet loopback

# The primary network interface
#allow-hotplug enx000acd26e2c8
allow-hotplug eth0

#iface enx000acd26e2c8 inet dhcp
iface eth0 inet dhcp

# This is an autoconfigured IPv6 interface
#iface enx000acd26e2c8 inet6 auto
iface eth0 inet6 auto
Danach einmal alles neu starten bitte
systemctl status networkingDa fehlte mir aber jetzt die IPv4 Adresse, so das ich einmal komplett neugestartet habe. Der Ordnung halber, so hätte man die IPv4 Adresse bekommen.
dhclient eth0Nachdem Neustart kam dann das
root@debian:/etc/network# ip a
1: lo: <LOOPBACK,UP,LOWER_UP> mtu 65536 qdisc noqueue state UNKNOWN group default qlen 1000
    link/loopback 00:00:00:00:00:00 brd 00:00:00:00:00:00
    inet 127.0.0.1/8 scope host lo
       valid_lft forever preferred_lft forever
    inet6 ::1/128 scope host
       valid_lft forever preferred_lft forever
2: eth0: <BROADCAST,MULTICAST,UP,LOWER_UP> mtu 1500 qdisc mq state UP group default qlen 1000
    link/ether 62:03:b0:d6:dc:b3 brd ff:ff:ff:ff:ff:ff
    inet 192.168.3.172/24 brd 192.168.3.255 scope global dynamic eth0
       valid_lft 42452sec preferred_lft 42452sec
    inet6 fd8a:6ff:2880:0:6003:b0ff:fed6:dcb3/64 scope global dynamic mngtmpaddr
       valid_lft forever preferred_lft forever
    inet6 2a02:908:1260:13bc:6003:xxxx:xxxx:xxxx/64 scope global dynamic mngtmpaddr
       valid_lft 5667sec preferred_lft 2067sec
    inet6 fe80::6003:b0ff:fed6:dcb3/64 scope link
       valid_lft forever preferred_lft forever
3: enx000acd26e2c8: <BROADCAST,MULTICAST> mtu 1500 qdisc noop state DOWN group default qlen 1000
    link/ether 00:0a:cd:26:e2:c8 brd ff:ff:ff:ff:ff:ff
Fertig, eth0 läuft. Nun kann man den zusätzlichen Adapter entfernen oder halt konfigurieren, wenn man ihn braucht.
Warum der Debian Installer die eth0 nicht erkennt verstehe ich nicht, aber vielleicht wird das irgendwann auch noch gefixt. Jetzt habe ich erst mal einen Workaround um eine Installation auf den ROCKPro64 zu bekommen.
-
 F FrankM hat am auf dieses Thema verwiesen
-
NanoPi R2S - OpenWRT VLAN
Verschoben NanoPi R2S -
-
-
-
-
-
[HOWTO]ROCKPro64 - NAS bauen Teil 1
Angeheftet ROCKPro64 -